

|
Check out these great references as well: |
| Our Wireless custom profile for Wireshark |
| Our Udemy course on Wireless Packet capture |
| Our other Wi-Fi related articles |
At a recent course I taught in New England, one of the students wanted to capture Wi-Fi packets on their Windows Surface Pro. Of course, I referred them to my article on how to capture Wi-Fi traffic on Windows for free article. The student tried this and was not able to properly configure Microsoft Network Monitor to do the job on the Windows Surface Pro platform [always a mystery to me about the complexities of Microsoft].
I suggested they try using Linux instead, to get around whatever difficulty Microsoft built into the Surface. They tried a Linux virtual machine (VM) and had no luck with this either. They then even tried booting Linux from a bootable disk with no luck. Finally, they tried capturing on a different machine that ran Linux as it’s primary operating system and had difficulty as well.
I am sure others have suffered through this, in my opinion, needless pain. One horribly expensive option is to buy an Apple! You can easily put your interfaces into monitor mode and MAC-OS. Look at my article here (https://www.cellstream.com/reference-reading/tipsandtricks/442-capturing-wi-fi-wlan-packets-in-wireshark-on-macosx ) for MAC users. OK, ok, perhaps not an option.
Note: I do not show it here, but you may want to get our Wi-Fi/WLAN profile for Wireshark: https://www.cellstream.com/reference-reading/tipsandtricks/284-a-wireshark-wifi-profile Honestly, this is optional but if you want to do it right…. 🙂
Let’s look at the possibilities. The issue here is we are trying to do two things:
- We want to use the wireless interface on the host machine.
- We need to be able to put the Linux machine into monitor mode so we can see the Wi-Fi traffic.
Further, we have the issue of virtual networking in either VirtualBox or VMware. We also have the problem of multiple distributions of Linux. I am going to deal with two: Ubuntu and Kali Linux.
So as you can see this is messy. I hope that my answers either help or if not, that when others find further details they will add comments below. But before I do, if you have Wireshark loaded onto your Linux OS and cannot see any interfaces like shown below (interfaces should show up in the center white area):
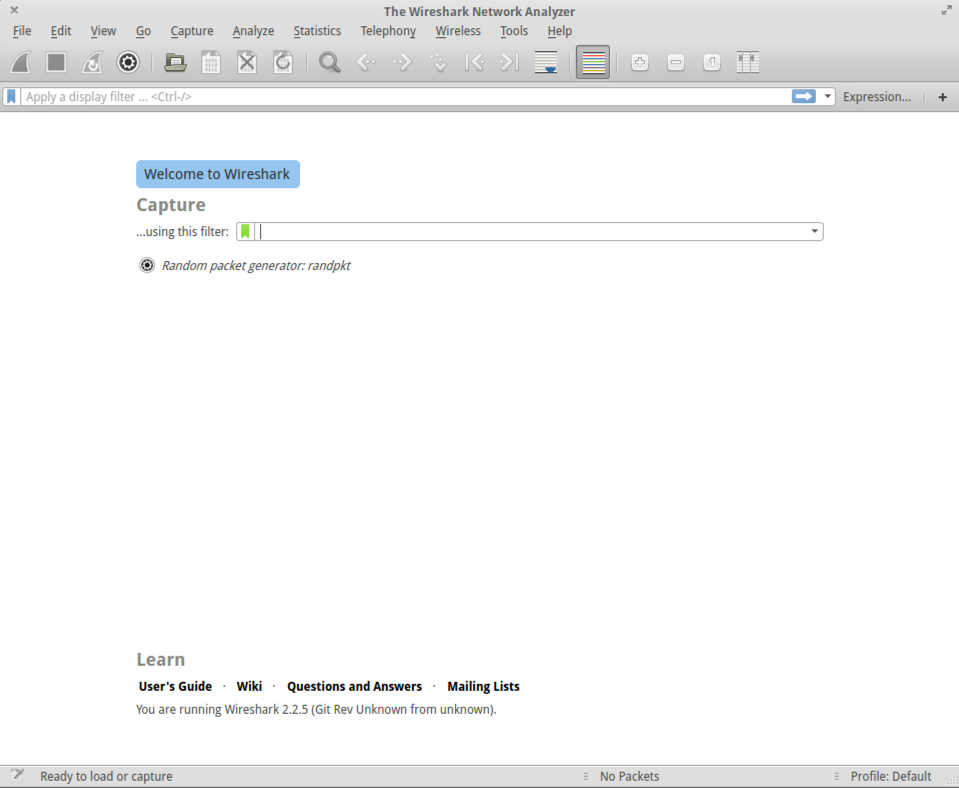
Make sure you read this article: https://www.cellstream.com/intranet/reference-reading/faq/106-how-do-i-get-ubuntu-to-show-interfaces-in-wireshark.html
That said let’s move on.
Dealing with Virtualized Environments
If you run Linux in a virtual environment such as VirtualBox or VMware, you will be in for a bit of a surprise. Both these environments allow you to configure the network settings for each virtual machine. Both will bridge the Wireless interface to your Linux VM, which is the way to get your VM to use the Wireless interface. However, in the latest versions, they both do this through a bridge module, and so your VM will only see the interface as a regular ethernet connection. This means you cannot access the Wireless interface built into your machine directly through the VM to put it in monitor mode.
You have two options:
- Get a USB wireless adapter and assign the USB in the virtual environment to the VM system. I have written an article about that here.
- Have a bootable USB running Linux, and then boot your normally Windows system on the USB. (Some have asked how this is done – look here) You can then configure that system as shown below.
Accessing the Wireless Interface in Linux on a Stand Alone System
It is important to know if you can see the wireless interface in your Linux environment. To check this, open a terminal window and enter the following command: iwconfig
You should see an output that displays your system network interfaces that support wireless extensions:
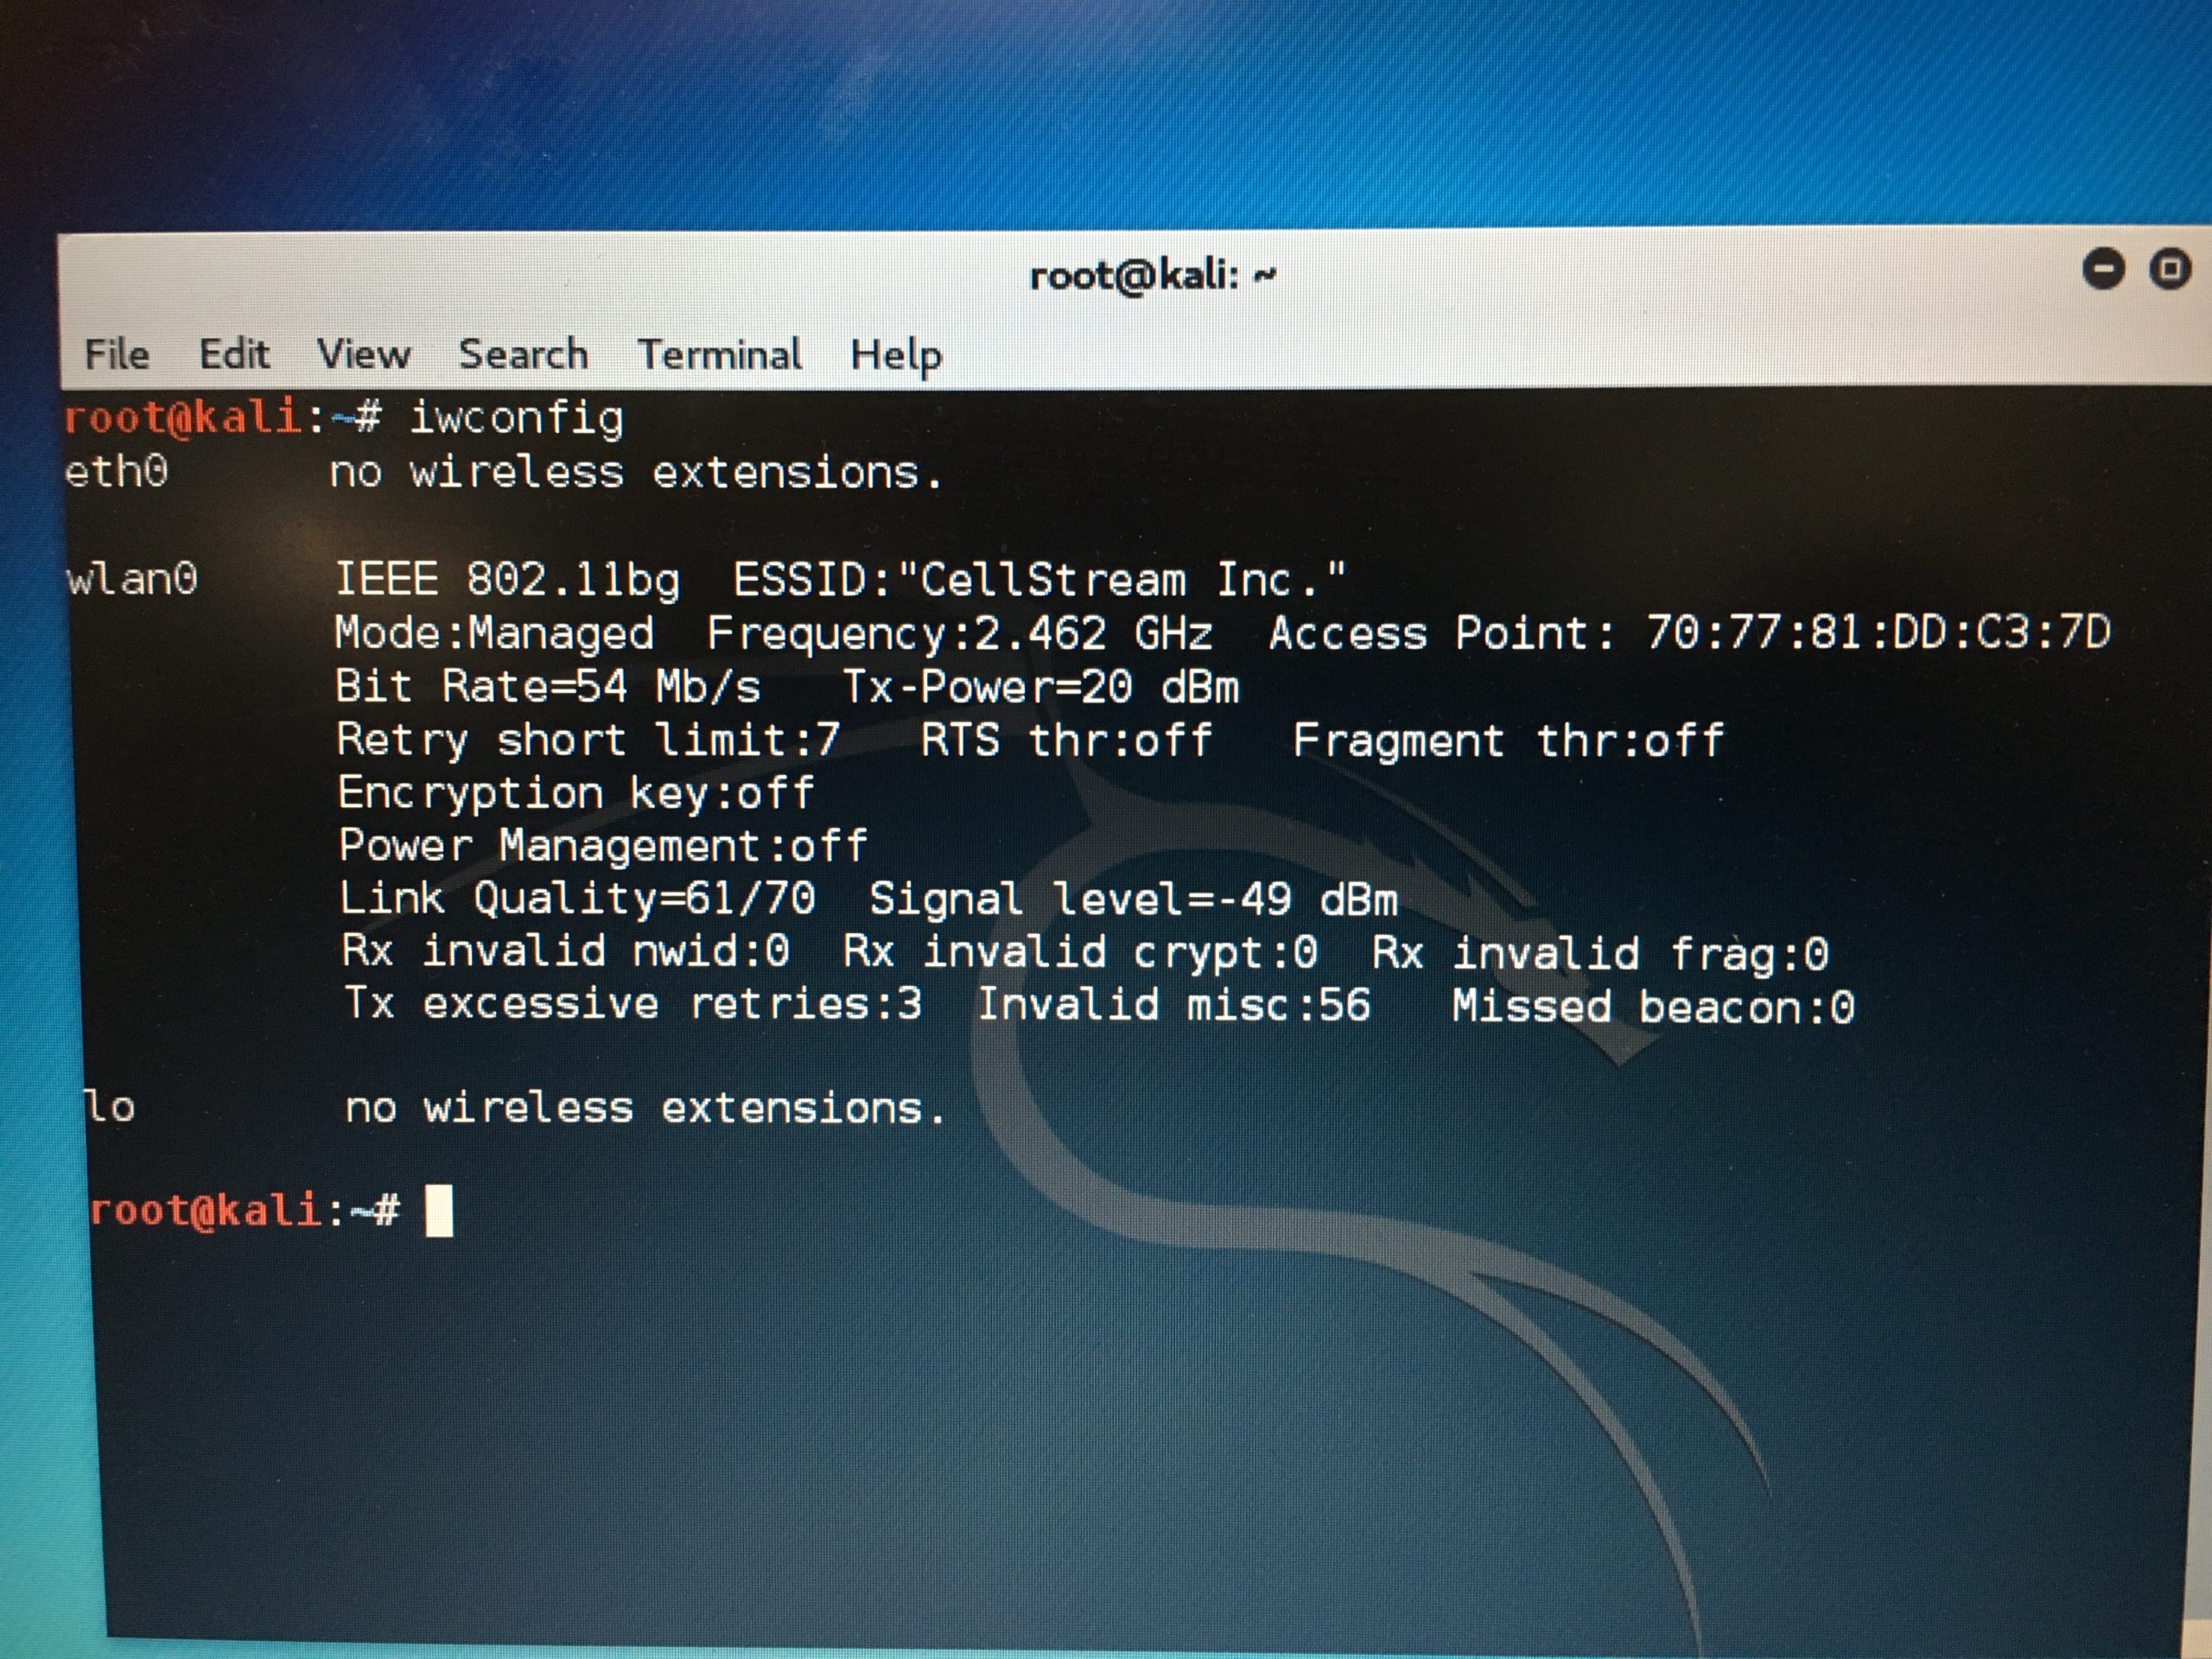
You can see above, i was using Kali Linux – it is running on a stand alone laptop. You can see my wireless interface is called wlan0. Some of you may see the wireless interface as eth1. Newer versions of Linux now use the wlo1 nomenclature.
If you look closely at the second line, it says ‘Mode: Managed”. This means the system is attached to an Access Point and is operational. It is followed by a bunch of physical layer information on the connection.
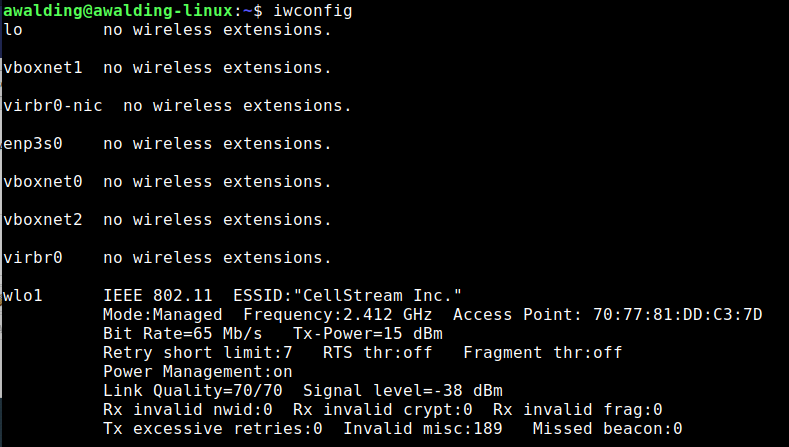
On newer Linux systems it may look like this (note the WLAN interface is not ‘wlan0’ but now ‘wlo1’:
Now the next step is to put the interface into Monitor mode. I was a superuser so I did not have to use ‘sudo’, but you may have to do this on your Linux box. Simply add ‘sudo’ before all the commands below:
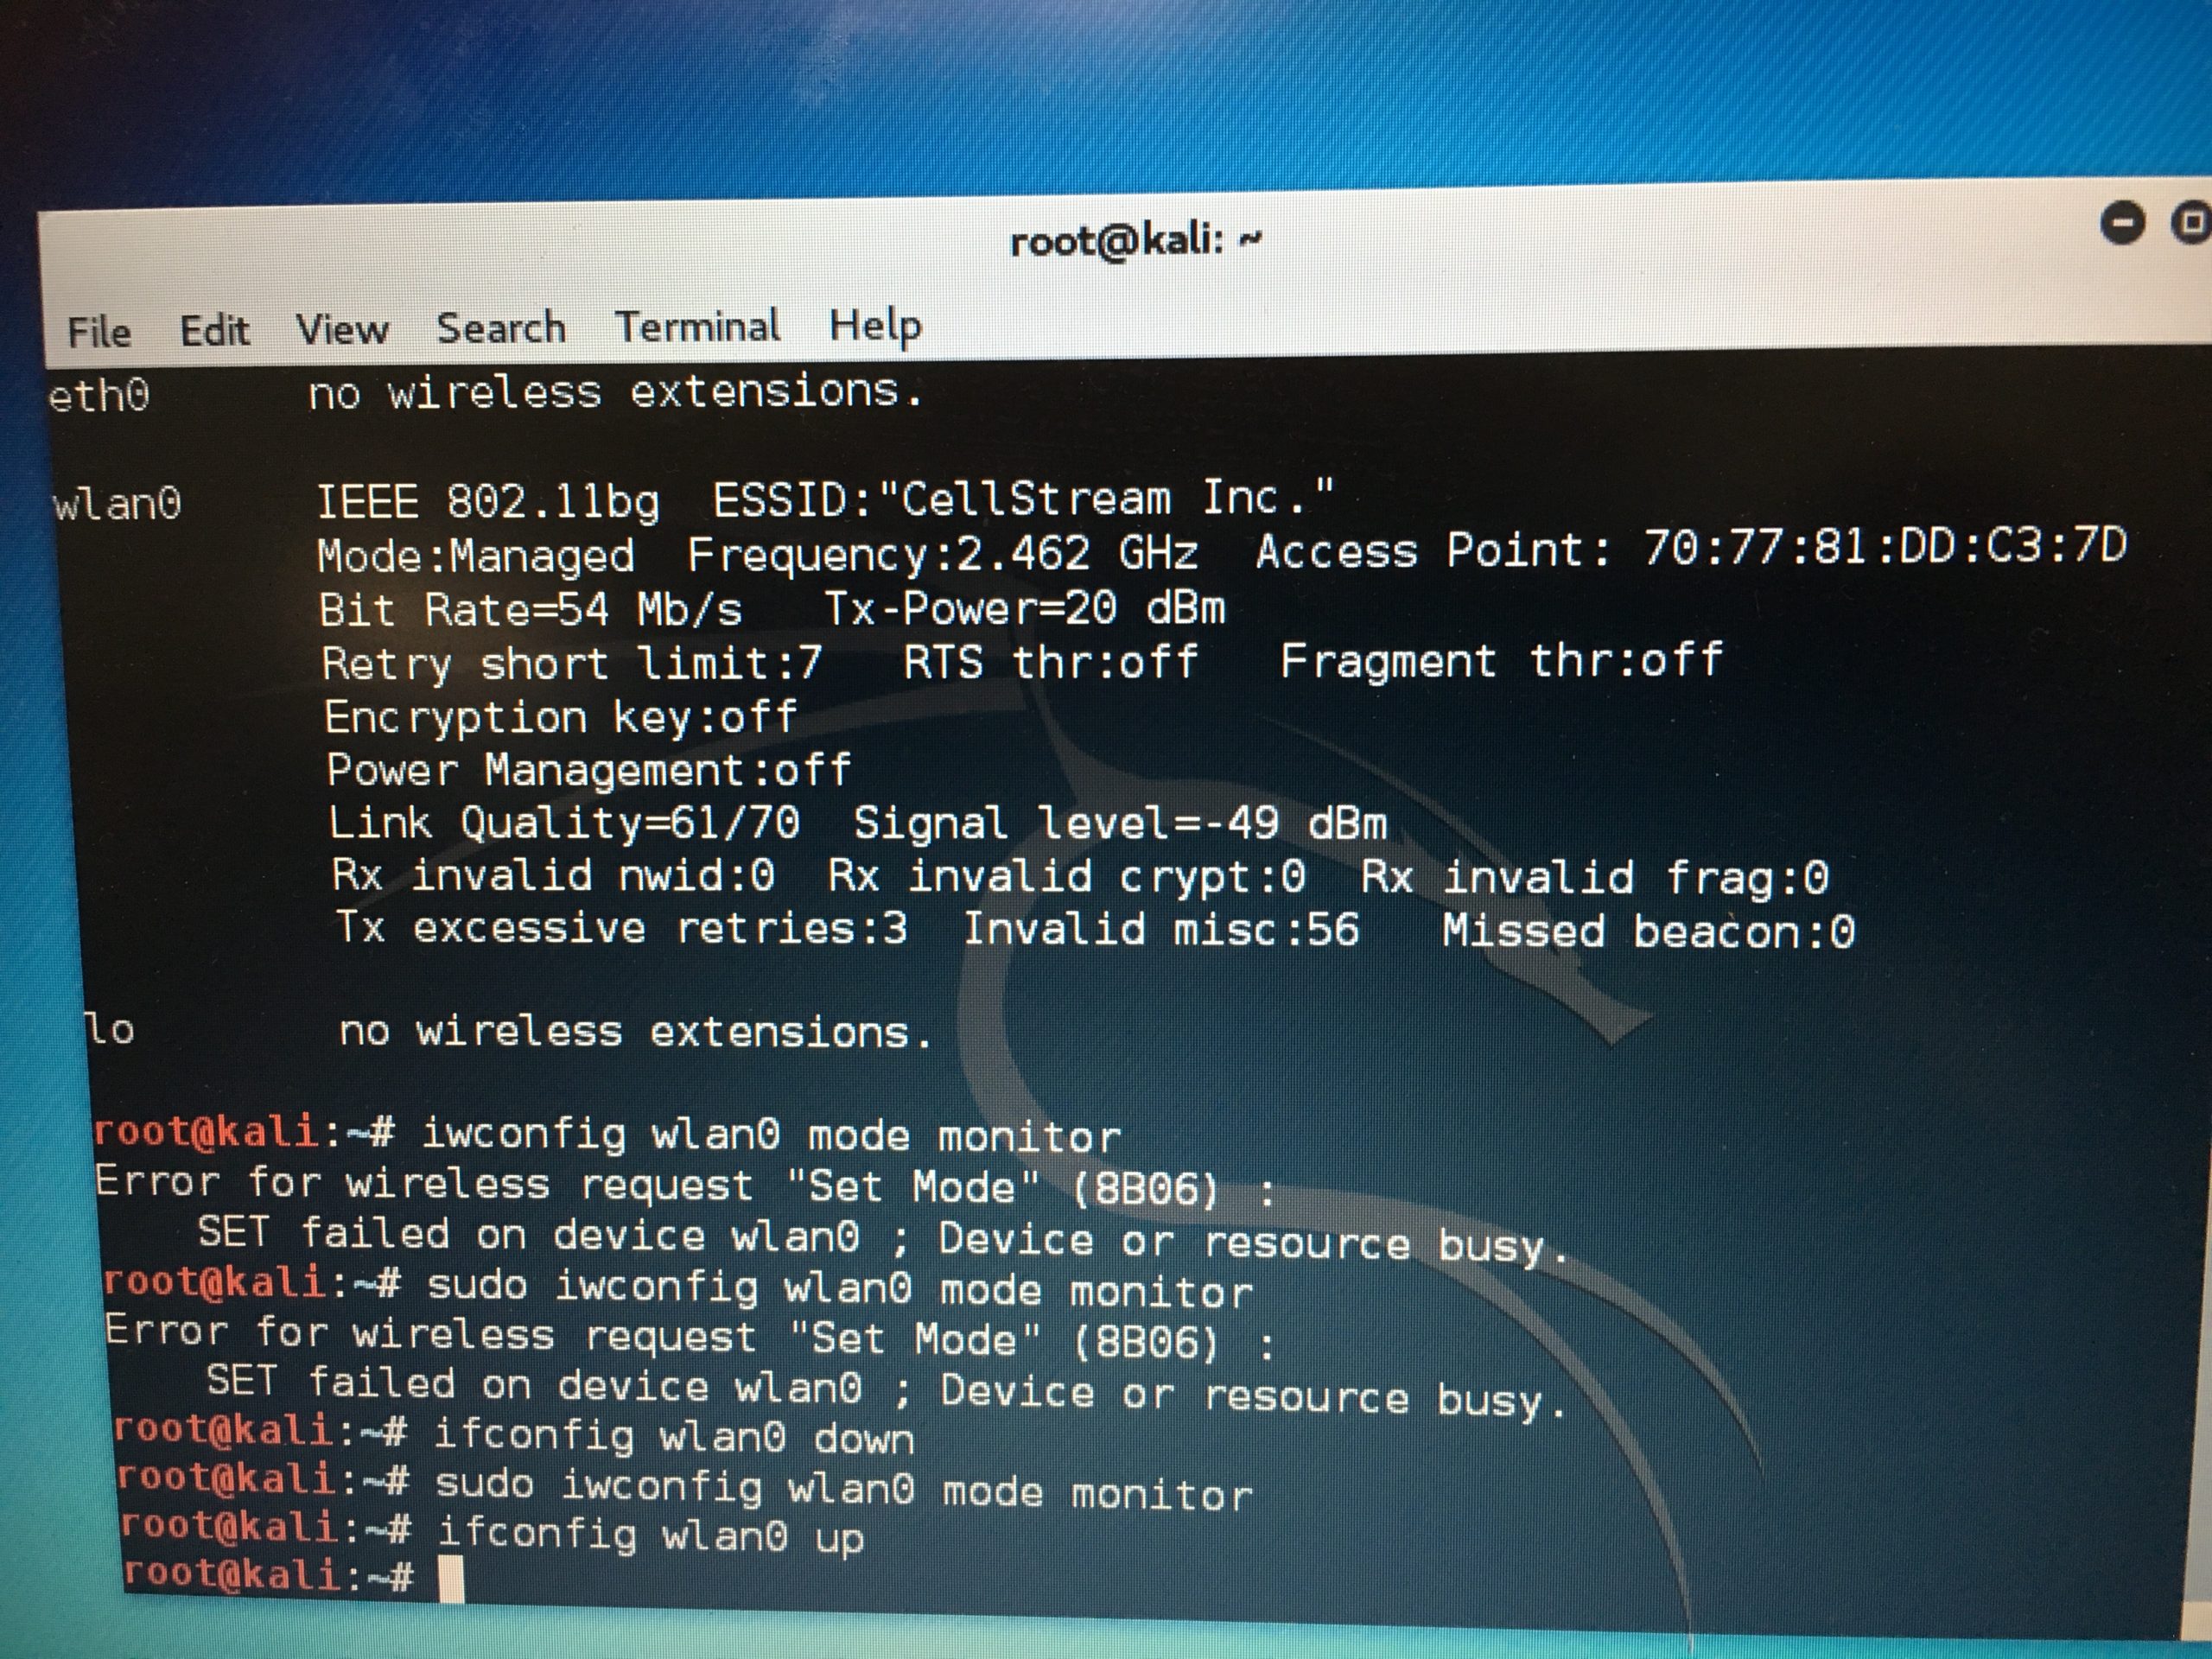
To do this you will see I tried above to type the command: iwconfig wlan0 mode monitor
And you see I got an error. So I tried it with ‘sudo’ and got the same error. The problem here is I need to take the interface offline first.
So the next command I entered ‘ifconfig wlan0 down‘
Then I tried once again to put the interface into monitor mode, and it worked. If you are not the superuser, you may need to use ‘sudo’ in front of these commands.
Lastly, I brought the interface back up with ‘ifconfig wlan0 up‘.
If you cannot get the interface into Monitor Mode, then that means it probably does not support monitor mode. So let’s digress a little for those folks. This means that you need to get an external Wi-Fi interface that does. The following chipsets are known to support monitor mode and packet injection, but there may be more:
- Atheros AR9271: The Alfa AWUS036NHA is a great long-range network adapter. There’s also the TP-Link TL-WN722N but only v1 will work with Kali Linux since v2 uses a different chipset.
- Ralink RT3070: This chipset is used by a number of popular wireless network adapters. Of those, the Alfa AWUS036NH is a b/g/n adapter with great range. For a more discreet wireless adapter that can be plugged in via USB, the Alfa AWUS036NEH is a powerful b/g/n adapter that’s slim and doesn’t require a USB cable to use. If you need a stealthier option, you might consider the g/n Panda PAU05.
- Ralink RT3572: While the previous adapters have been 2.4 GHz only, the Alfa AWUS051NH v2 is a dual-band adapter that is also compatible with 5 GHz networks.
- Realtek 8187L (Wireless G adapters): The Alfa AWUS036H USB 2.4 GHz adapters use this older chipset that is less useful and will not pick up as many networks.
- Realtek RTL8812AU: Supported in 2017, the Alfa AWUS036ACH is a beast, with dual antennas and 802.11ac and a, b, g, n compatibility with 300 Mbps at 2.4 GHz and 867 Mbps at 5 GHz. It’s one of the newest offerings that are compatible with Kali. To use it, you may need to first run “apt update” followed by “apt install realtek-rtl88xxau-dkms” which will install the needed drivers to enable packet injection.
Aircrack-ng also lists a few cards as best in class on its site, so if you’re interested in more suggestions, check it out (some of the ones listed above are also on its list).
OK let’s assume everything worked.
In newer versions of Linux with the new interface nomenclature you need to replace ‘wlan0’ in the above commands with ‘wlo1’. So the commands would be:
sudo iwconfig wlo1 down
sudo iwconfig wlo1 mode monitor
sudo iwconfig wlo1 up
Now let’s run Wireshark and capture on the wireless interface:
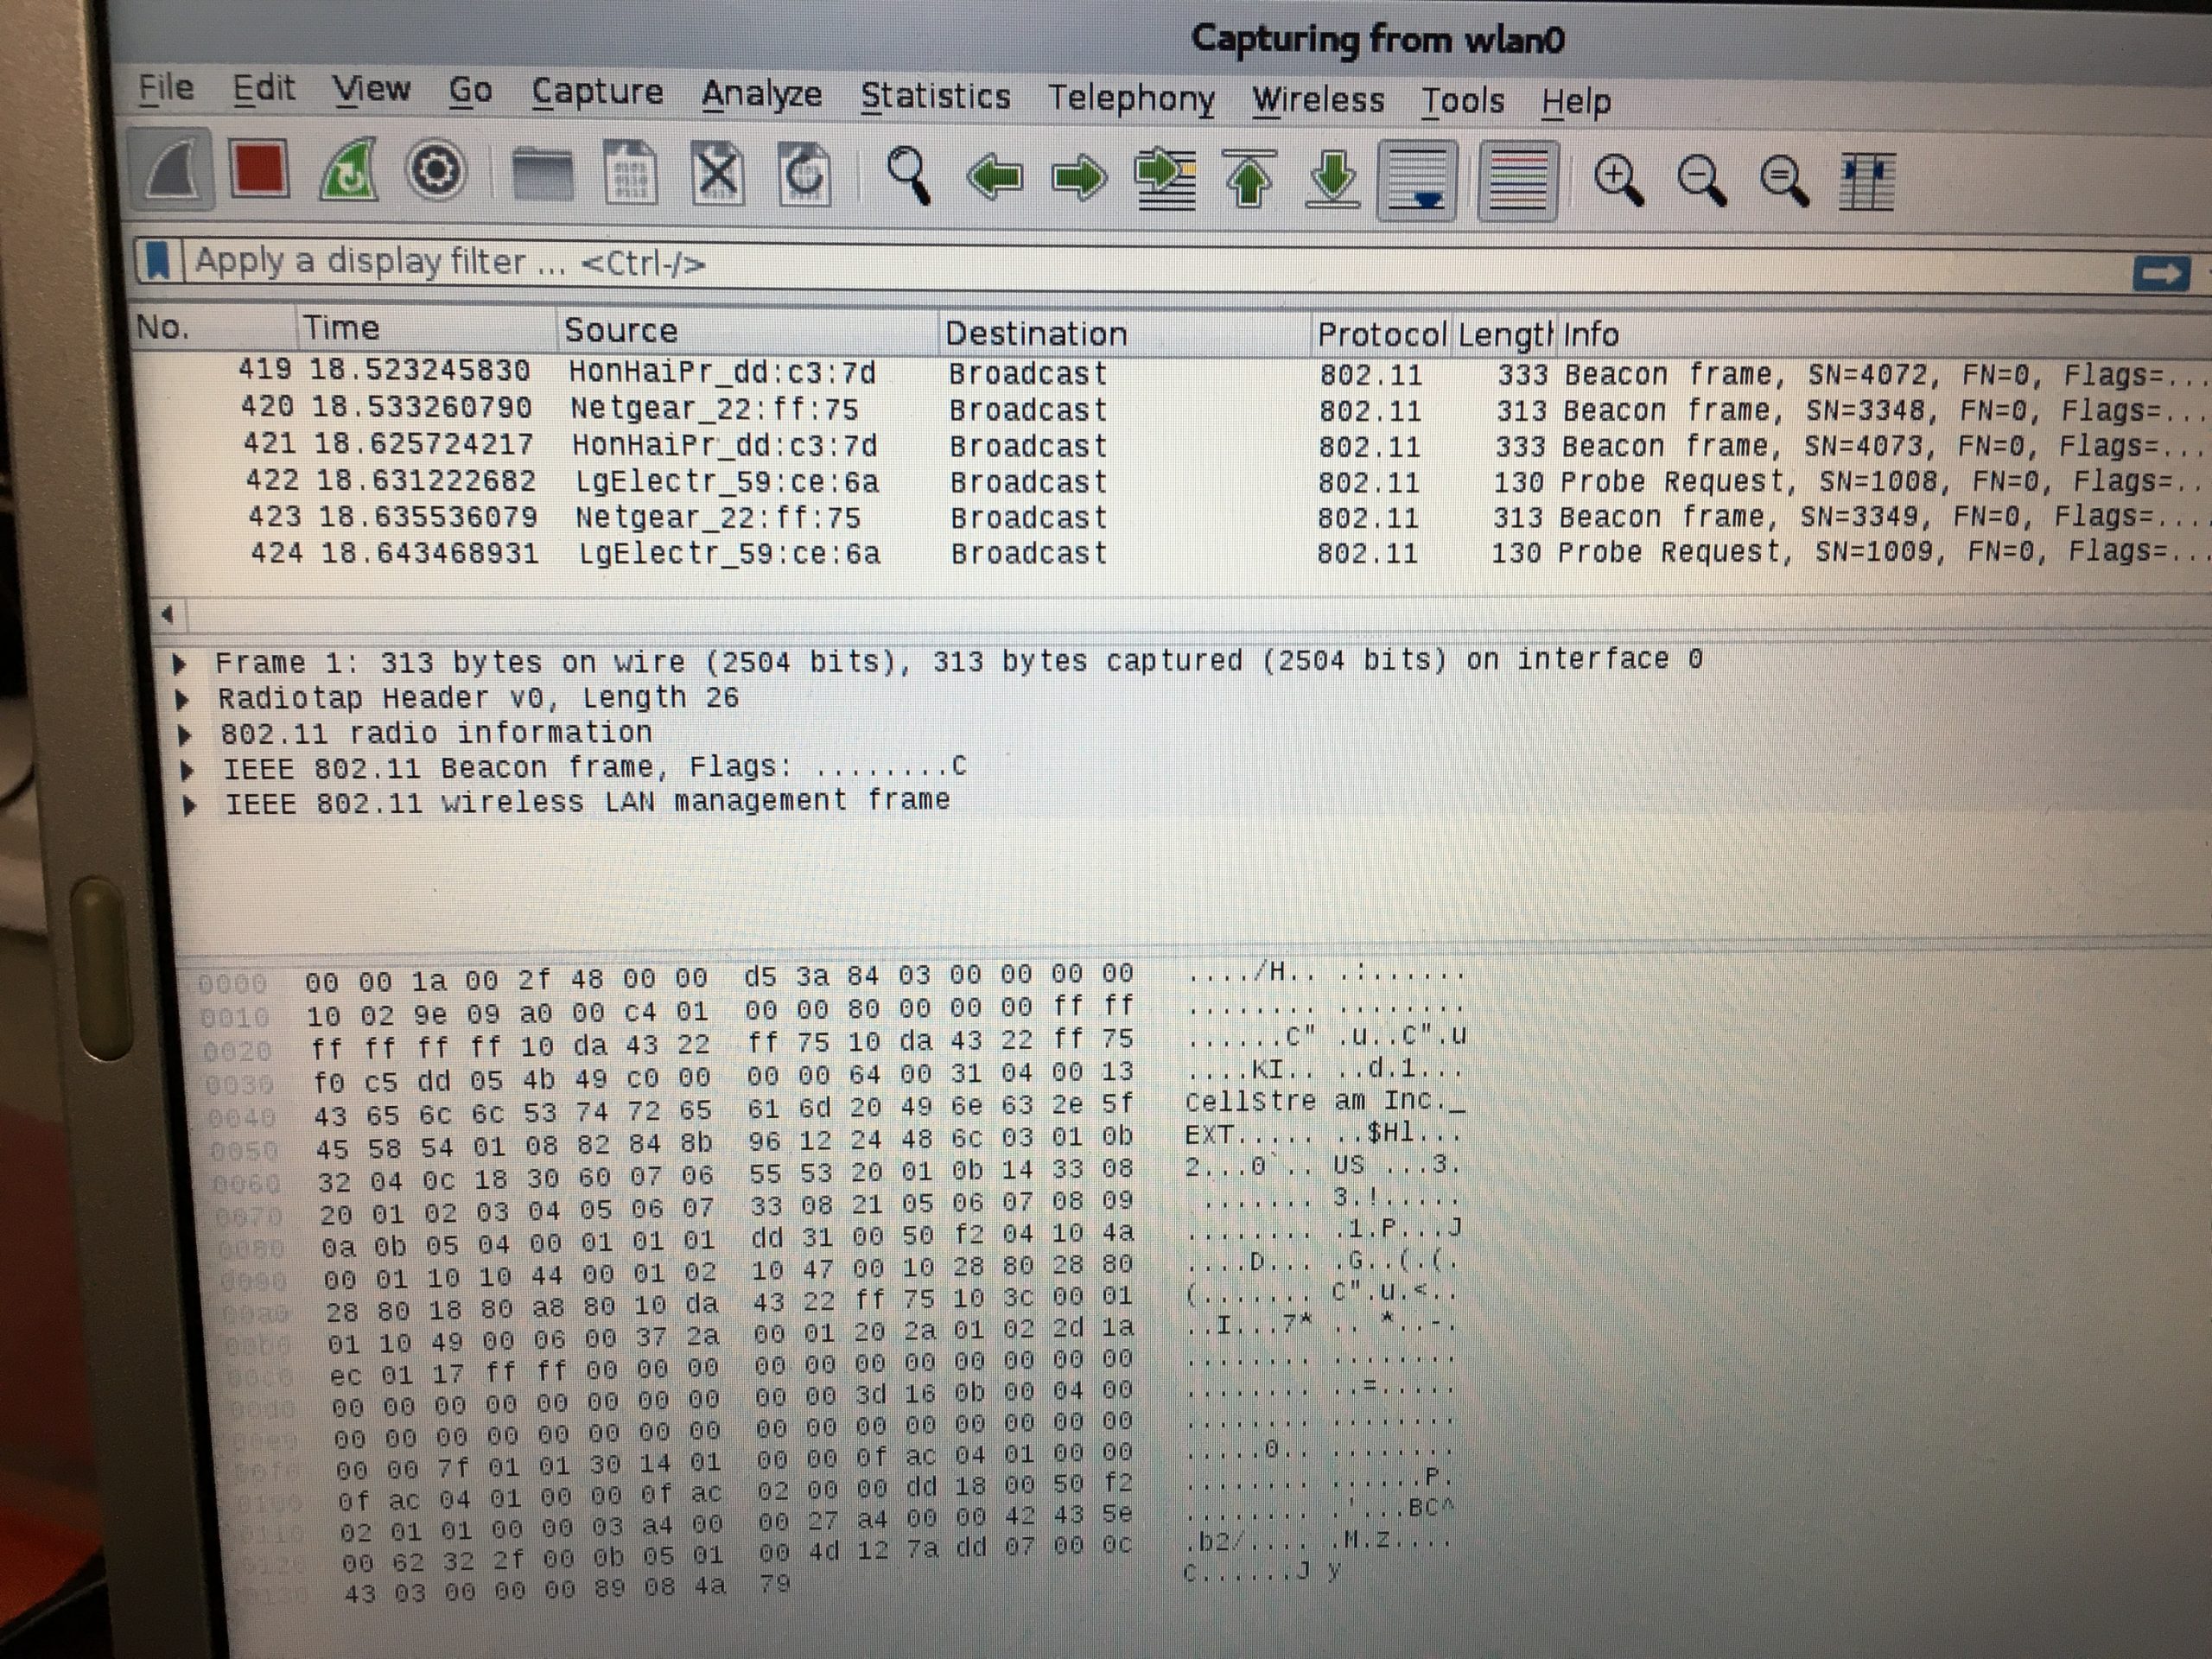
Looks perfect, and I can see the Wi-Fi control frames.
Now to return the interface to normal, you need to shut it down, return it to managed mode and then bring it back up:
ifconfig wlan0 down
iwconfig wlan0 mode managed
ifconfig wlan0 up
Just replace the ‘wlan0’ with ‘wlo1’ for the newer versions of Linux.
Perfect! All of this should work on any version of Linux.
Some Other Linux and Wi-Fi Stuff
I had one person tell me that they could not put their hardware into monitor mode, so I had them check a few things. First, there is an additional command in Linux called the ‘iw’ command that was to have replaced iwconfig, and it is a little different.
Let’s try it:
root@kali:~# iw dev
 phy#0
     Interface wlan0
         ifindex 3
         wdev 0x1
         addr 00:1b:fc:51:4d:a0
         type managed
         channel 11 (2462 MHz), width: 20 MHz (no HT), center1: 2462 MHz
Nice! We see the interface is wlan0, we see the MAC address, that we are in managed mode on channel 11 with the channel width and center frequency.
You can get deeper information with the ‘iw phy phy0 info‘ command:
root@kali:~# iw phy phy0 info
 Wiphy phy0
     max # scan SSIDs: 4
     max scan IEs length: 2285 bytes
     max # sched scan SSIDs: 0
     max # match sets: 0
     Retry short limit: 7
     Retry long limit: 4
     Coverage class: 0 (up to 0m)
     Device supports RSN-IBSS.
     Supported Ciphers:
         * WEP40 (00-0f-ac:1)
         * WEP104 (00-0f-ac:5)
         * TKIP (00-0f-ac:2)
         * CCMP-128 (00-0f-ac:4)
         * CCMP-256 (00-0f-ac:10)
         * GCMP-128 (00-0f-ac:8)
         * GCMP-256 (00-0f-ac:9)
     Available Antennas: TX 0 RX 0
     Supported interface modes:
          * IBSS
          * managed
          * AP
          * AP/VLAN
          * WDS
          * monitor
          * mesh point
     Band 1:
         Bitrates (non-HT):
             * 1.0 Mbps
             * 2.0 Mbps (short preamble supported)
             * 5.5 Mbps (short preamble supported)
             * 11.0 Mbps (short preamble supported)
             * 6.0 Mbps
             * 9.0 Mbps
             * 12.0 Mbps
             * 18.0 Mbps
             * 24.0 Mbps
             * 36.0 Mbps
             * 48.0 Mbps
             * 54.0 Mbps
         Frequencies:
             * 2412 MHz [1] (20.0 dBm)
             * 2417 MHz [2] (20.0 dBm)
             * 2422 MHz [3] (20.0 dBm)
             * 2427 MHz [4] (20.0 dBm)
             * 2432 MHz [5] (20.0 dBm)
             * 2437 MHz [6] (20.0 dBm)
             * 2442 MHz [7] (20.0 dBm)
             * 2447 MHz [8] (20.0 dBm)
             * 2452 MHz [9] (20.0 dBm)
             * 2457 MHz [10] (20.0 dBm)
             * 2462 MHz [11] (20.0 dBm)
             * 2467 MHz [12] (20.0 dBm) (no IR)
             * 2472 MHz [13] (20.0 dBm) (no IR)
             * 2484 MHz [14] (20.0 dBm) (no IR)
     Supported commands:
          * new_interface
          * set_interface
          * new_key
          * start_ap
          * new_station
          * new_mpath
          * set_mesh_config
          * set_bss
          * authenticate
          * associate
          * deauthenticate
          * disassociate
          * join_ibss
          * join_mesh
          * set_tx_bitrate_mask
          * frame
          * frame_wait_cancel
          * set_wiphy_netns
          * set_channel
          * set_wds_peer
          * probe_client
          * set_noack_map
          * register_beacons
          * start_p2p_device
          * set_mcast_rate
          * set_qos_map
          * connect
          * disconnect
     Supported TX frame types:
          * IBSS: 0x00 0x10 0x20 0x30 0x40 0x50 0x60 0x70 0x80 0x90 0xa0 0xb0 0xc0 0xd0 0xe0 0xf0
          * managed: 0x00 0x10 0x20 0x30 0x40 0x50 0x60 0x70 0x80 0x90 0xa0 0xb0 0xc0 0xd0 0xe0 0xf0
          * AP: 0x00 0x10 0x20 0x30 0x40 0x50 0x60 0x70 0x80 0x90 0xa0 0xb0 0xc0 0xd0 0xe0 0xf0
          * AP/VLAN: 0x00 0x10 0x20 0x30 0x40 0x50 0x60 0x70 0x80 0x90 0xa0 0xb0 0xc0 0xd0 0xe0 0xf0
          * mesh point: 0x00 0x10 0x20 0x30 0x40 0x50 0x60 0x70 0x80 0x90 0xa0 0xb0 0xc0 0xd0 0xe0 0xf0
          * P2P-client: 0x00 0x10 0x20 0x30 0x40 0x50 0x60 0x70 0x80 0x90 0xa0 0xb0 0xc0 0xd0 0xe0 0xf0
          * P2P-GO: 0x00 0x10 0x20 0x30 0x40 0x50 0x60 0x70 0x80 0x90 0xa0 0xb0 0xc0 0xd0 0xe0 0xf0
          * P2P-device: 0x00 0x10 0x20 0x30 0x40 0x50 0x60 0x70 0x80 0x90 0xa0 0xb0 0xc0 0xd0 0xe0 0xf0
     Supported RX frame types:
          * IBSS: 0x40 0xb0 0xc0 0xd0
          * managed: 0x40 0xd0
          * AP: 0x00 0x20 0x40 0xa0 0xb0 0xc0 0xd0
          * AP/VLAN: 0x00 0x20 0x40 0xa0 0xb0 0xc0 0xd0
          * mesh point: 0xb0 0xc0 0xd0
          * P2P-client: 0x40 0xd0
          * P2P-GO: 0x00 0x20 0x40 0xa0 0xb0 0xc0 0xd0
          * P2P-device: 0x40 0xd0
     software interface modes (can always be added):
          * AP/VLAN
          * monitor
     interface combinations are not supported
     HT Capability overrides:
          * MCS: ff ff ff ff ff ff ff ff ff ff
          * maximum A-MSDU length
          * supported channel width
          * short GI for 40 MHz
          * max A-MPDU length exponent
          * min MPDU start spacing
     Device supports TX status socket option.
     Device supports HT-IBSS.
     Device supports SAE with AUTHENTICATE command
     Device supports low priority scan.
     Device supports scan flush.
     Device supports AP scan.
     Device supports per-vif TX power setting
     Driver supports a userspace MPM
     Device supports configuring vdev MAC-addr on create.
Wow, that is a truly nice report on all the WLAN parameters and service set features.
Now, what if you wanted to a) put your system into monitor mode, and b) set the channel/frequency to monitor? The output above clearly shows the channels and frequencies supported by the system hardware. It is easy to take that information and then use it. For example, if we wanted channel 11, we simply follow the process discussed earlier to put the Wi-Fi interface into monitor mode. If we wanted to monitor channel 2 which is at 2417 MHz, then we do the following (keep in mind you may have to put ‘sudo’ in front of these commands):
- Take the wlan0 interface down: ‘ifconfig wlan0 down’
- Set the frequency: ‘iwconfig wlan0 freq 2.147’
- Put the wlan0 interface into monitor mode: ‘iwconfig wlan0 mode monitor’
- Bring the interface back up: ‘ifconfig wlan0 up’
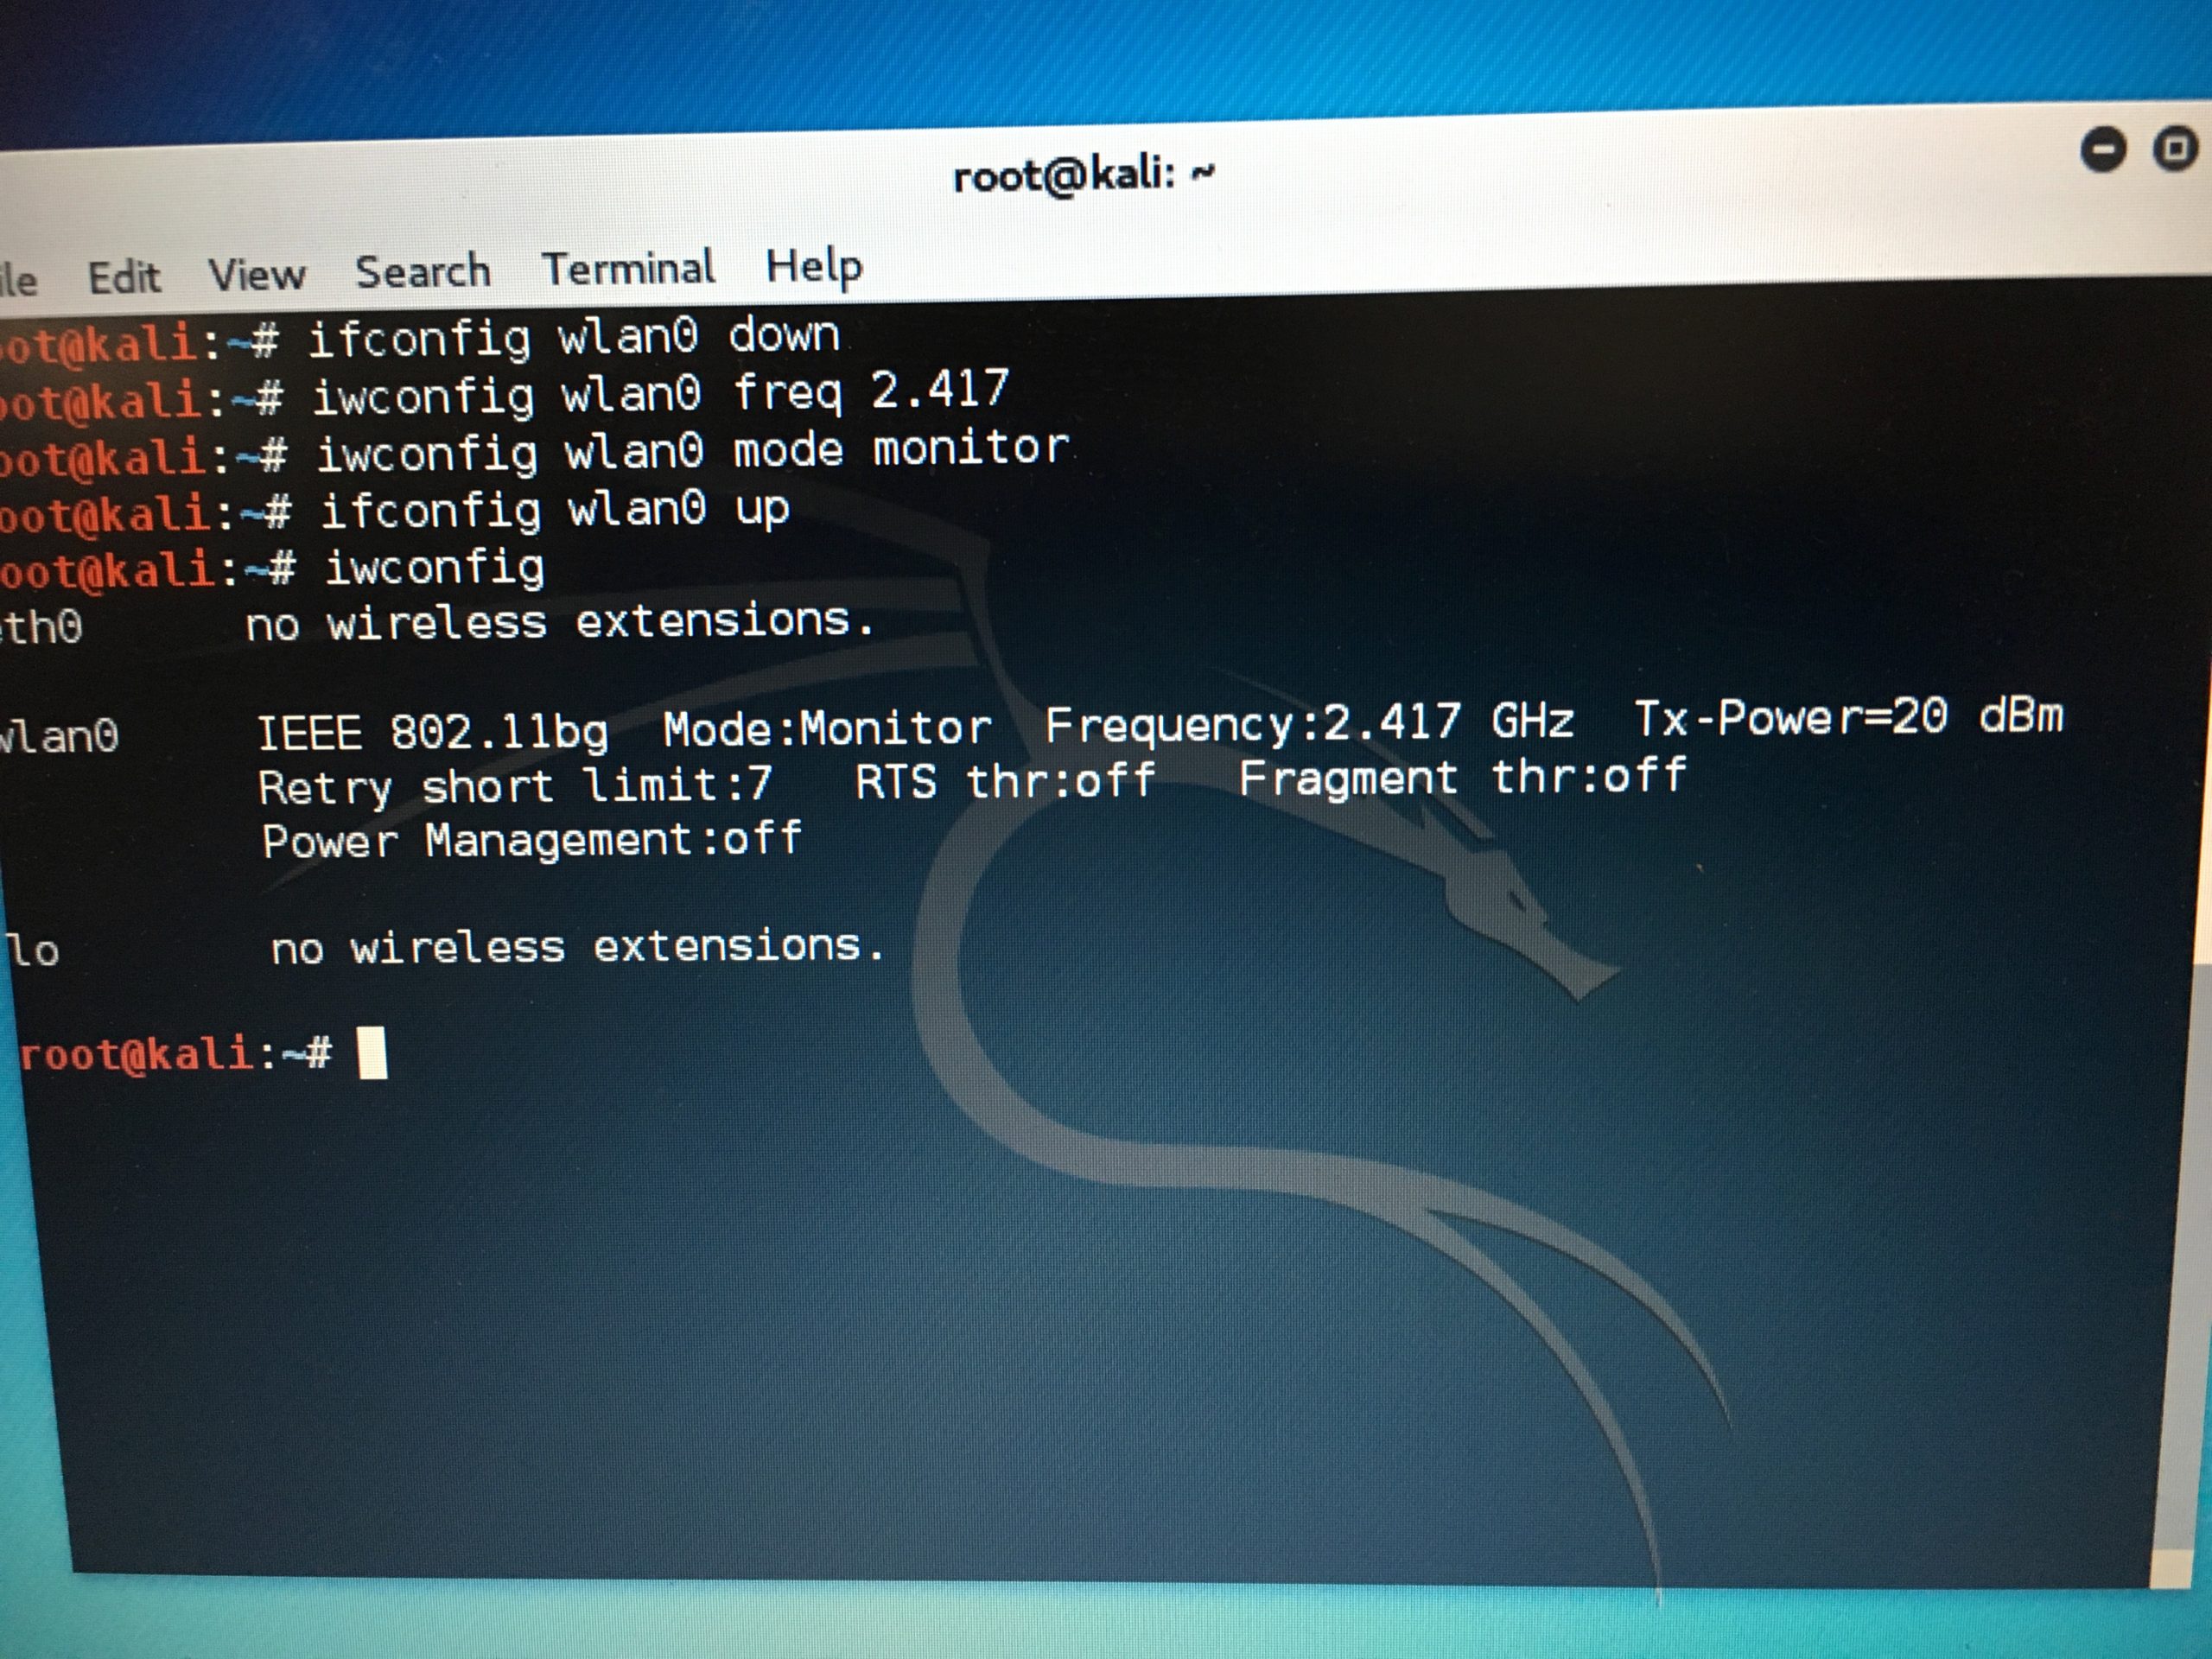
We can see that the interface is in monitor mode and the frequency has changed.
You can also do this by channel number. To assign the interface to a particular channel:
sudo iwconfig wlo1 channel xx
Replace xx with the number of the channel for the wi-fi you’re trying to connect.
Now we can start capturing on Wireshark using the wlan0 interface. If you previously had Wireshark open, close it and re-open it.
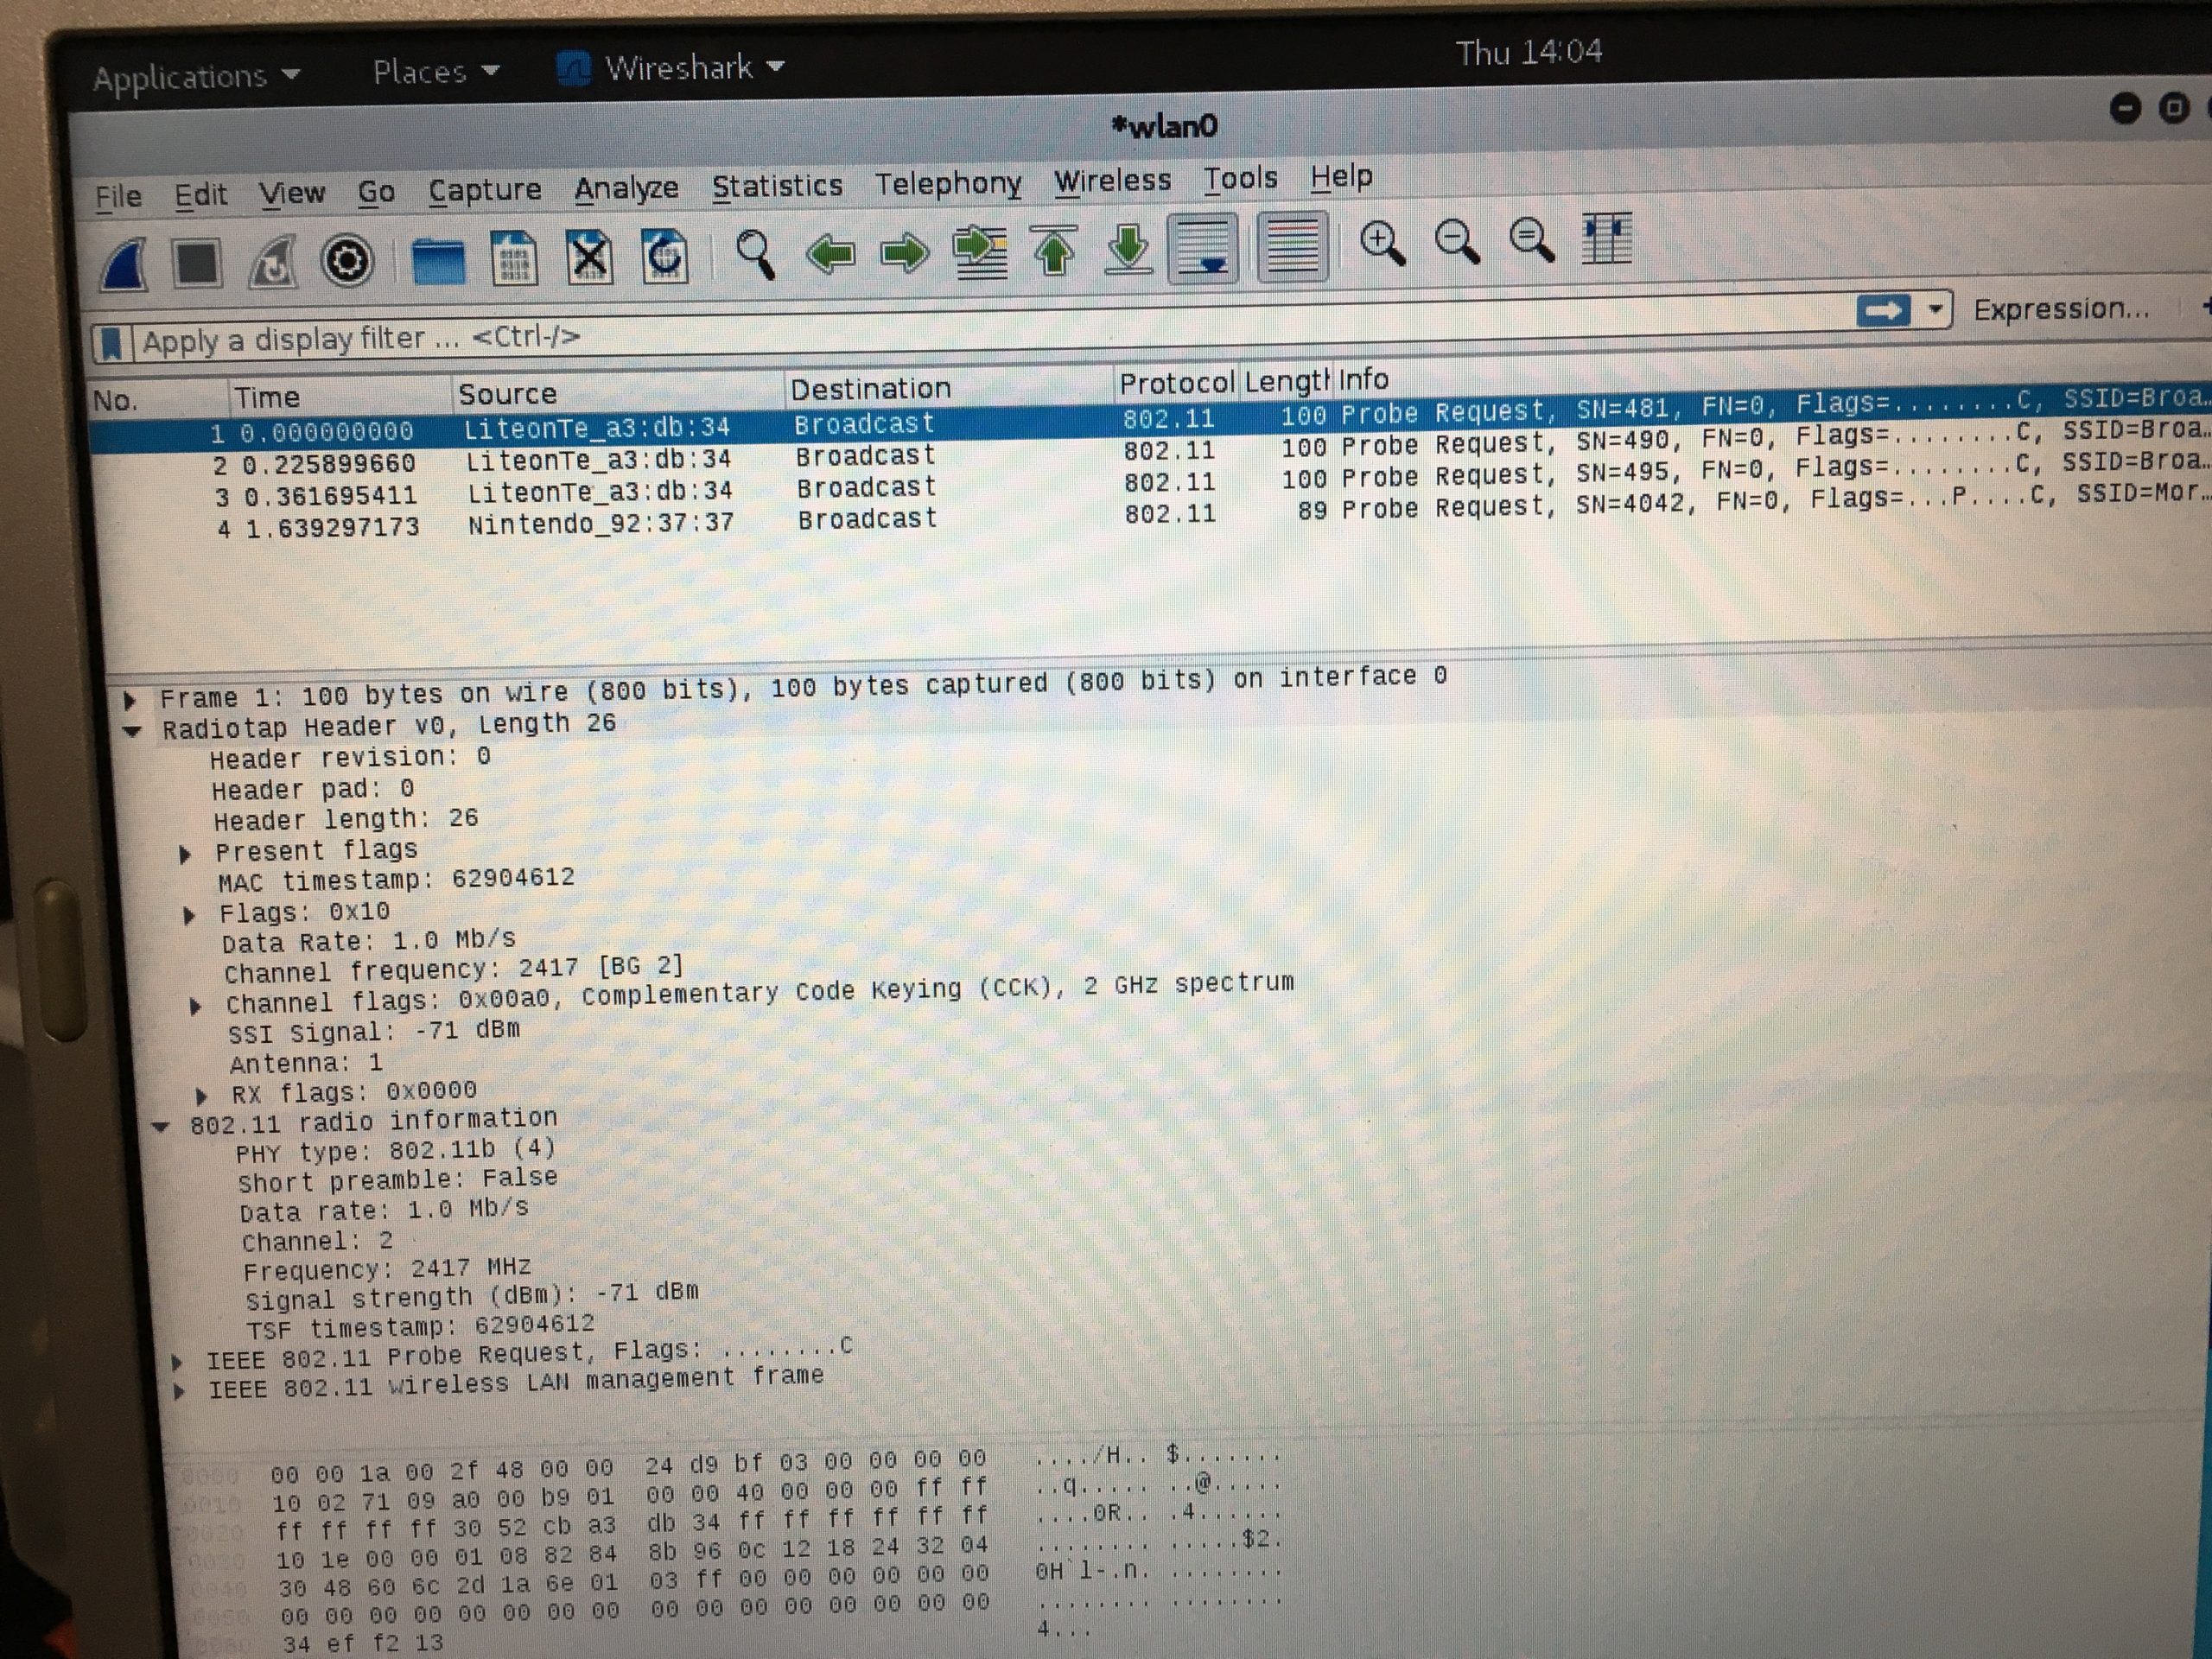
I expanded the Radiotap header and you can see that we are capturing on channel 2! Only probe requests as no one is on that channel (thank goodness!).
To return everything to normal, issue these commands:
- ifconfig wlan0 down
- iwconfig wlan0 mode managed
- ifconfig wlan0 up
You may have to reboot Linux to get your wireless icon back in the tool bar.
Installing Wireshark in Linux
Let’s begin with taking a step backwards first, and look at how to install Wireshark onto Linux. Kali Linux comes with Wireshark installed. Ubuntu does not. Whether you are on a stand alone system or a virtual machine, the steps are always the same:
Ubuntu
sudo add-apt-repository ppa:wireshark-dev/stable
sudo apt-get update
sudo apt-get install wireshark -y

You will get a dumpcap pop-up - select "Yes".
Now just run Wireshark by typing Wireshark in the terminal window or executing it from the applications list.
Other Linux Distributions
sudo apt-get install wireshark
sudo dpkg-reconfigure wireshark-common

You will be prompted to allow users to access dumpcap – select OK/Yes.

sudo usermod -a -G wireshark $USER
sudo reboot
Now just run Wireshark by typing Wireshark in the terminal window or executing it from the applications list.
I hope you find this article and its content helpful. Comments are welcomed below. If you would like to see more articles like this, please support us by clicking the patron link where you will receive free bonus access to courses and more, or simply buying us a cup of coffee!, and all comments are welcome!