Teredo Tunnels are a way to create a tunnel between two IPv6 end points (your computer and a web server) across the IPv4 network (your home or business and the Internet). In Windows 7 (and I believe Vista as well) you do not have to worry about using this if your home or business does not yet support IPv6. This should be alarming to all network administrators, because it probably means that people inside their network can tunnel out of their network flying through all firewalls! The good news here is that Teredo tunnels are not “automatic”; in other words, Microsoft has configured the protocol stack so that no connection is attempted to the IPv6 DNS. Teredo has been implemented as a “static” configuration, requiring us to statically configure the tunnel to specific destinations rather than simply use it in a web browser.
First, we need to examine the configuration of the system you are using.
- Since most of the steps require us to use the CMD Prompts in Administrator mode, begin by creating a shortcut to the CMD window on your desktop (right click on the desktop, select “New”, select “Shortcut”, enter “cmd” in the dialogue), then right click on that shortcut, and select “Run as Administrator”.
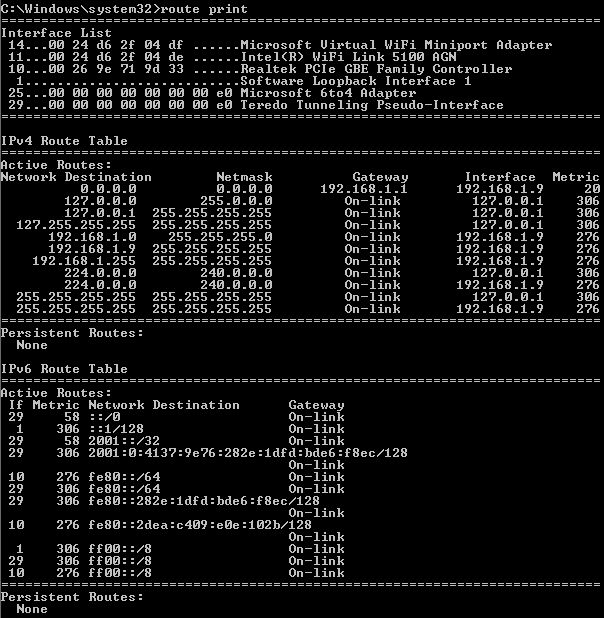
- Enter “route print” at the command line. It may scroll off the screen, but look for the “Teredo Tunneling Pseudo-Interface” at the top part of the output. You can see below that mine was #29.

- Now, let’s check the status of your Teredo Tunnel. This is done using the “netsh” command (you can read more about netsh here). At the command line, enter “netsh”.

- You will be at the netsh prompt as shown. Now enter “interface ipv6”. Note the prompt changes.

- Now, lets display your ipv6 information. At this new prompt enter “show interfaces”. Your output may differ, but you should see a couple of interesting things. Note your matching interface number for the Teredo Tunnel (mine was 29), note the smaller minimum IPv6 MTU of 1280, and note that you may have a default 6TO4 adapter. Also note the IPv6 loopback interface has a default MTU of 4 gigabytes!

- Now, let’s examine the status of the Teredo Tunnel. At the same netsh interface ipv6 prompt, enter “show teredo”. You will see there is a default server configured and the state should be dormant.

- Next, let’s create a default route to send all IPv6 traffic down the Teredo interface. At the command prompt enter “add route ::/0 interface=##” replacing the ## with your interface number. You will get an “Ok” response.

- Great! Let’s see if it works. The only way to test this is to now attempt to contact an IPv6 server. First open a second CMD window (does not have to be Run as Administrator). Try “ping -6 ipv6.google.com”. Two things will happen:
- 1st the ipv6.google.com will be resolved by the AAAA IPv6 DNS. You will see the IPv6 address.
- 2nd you should get valid responses from the IPv6 site.

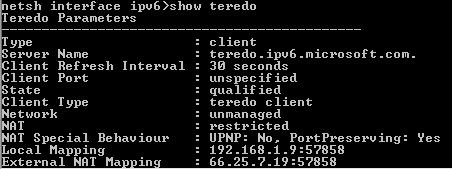
- You can also check back in your first CMD window to look at the change in state of the Teredo configuration. Re-enter “show teredo” and you will see that Windows has enabled the interface and it will display the PAT (Port Address Translation) information.

Congratulations! You have successfully built and used an IPv6 Teredo Tunnel!
To remove this static route, from the netsh interface ipv6 prompt, enter “delete route ::/0 interface=29”. You will get an “Ok”
Also, if you have been playing a little too much and want to reset the ntesh configurations to default, simply type “netsh interface ipv6 reset”, and then reboot.
Check out these additional IPv6 Resources: |
| Our IPv6 overview course at Udemy |
| Our IPv6 Custom Profiles for Wireshark |
| Our IPv6 classes at the Online School |
I hope you find this article and its content helpful. Comments are welcomed below. If you would like to see more articles like this, please support us by clicking the patron link where you will receive free bonus access to courses and more, or simply buying us a cup of coffee!, and all comments are welcome!
