Before I start, a couple of warnings. Make sure you are running one of the latest (10.x or 11.x) versions of Ubuntu Server. You can get this from the Ubuntu Web Site. Also make sure you have installed on the latest updates to your system.
The procedure I have noted is done from the commnad line in a Terminal Session (Applications> Accessories> Terminal).
We need to install Apache, MySQL and PHP. This can be easily done, all at once, with the following command:
sudo apt-get install apache2 php5-mysql libapache2-mod-php5 mysql-server
When you press enter, Ubuntu will download and install the three programs.
Watch the creen carefully, you will be prompted for a root password in MySQL. DO NOT leave this blank. Make sure you use a password you will remember.
When all is complete, verify your server IP Address:
ifconfig | grep inet
Your server will return its IP address. I will asume 192.168.1.10 for now. Replace this number with your IP address in the commands.
Now that you have that address, you sould be able to open a web browser to that address and veriy the new web server is opertaional.
Just enter http://192.168.1.10 replacing that with the address you see.
You should get a screen that says “It works! This is the default web page for this server. The web server software is running but no content has been added, yet.”
There is one step that we should do for the PHP server. First, lets back up the PHP config file:
sudo cp /etc/php5/apache2/php.ini /etc/php5/apache2/php.ini.bak
Next, open the configuration file in an editor:
sudo nano /etc/php5/apache2/php.ini
Scroll down using the down arrow, and find where the file says “expose_php = On” and change it to “expose_php = Off”.
Type Control-O, Yes, and Control-X to save and exit the editor.
Now we need to restart Apache:
sudo /etc/init.d/apache2 restart
Next, we recemmend that you install a firewall.
sudo apt-get install shorewall
No lets copy the example configurations that shorewall has installed in your usr folder to the shorewall folder:
sudo cp /usr/share/doc/shorewall/examples/one-interface/* /etc/shorewall/
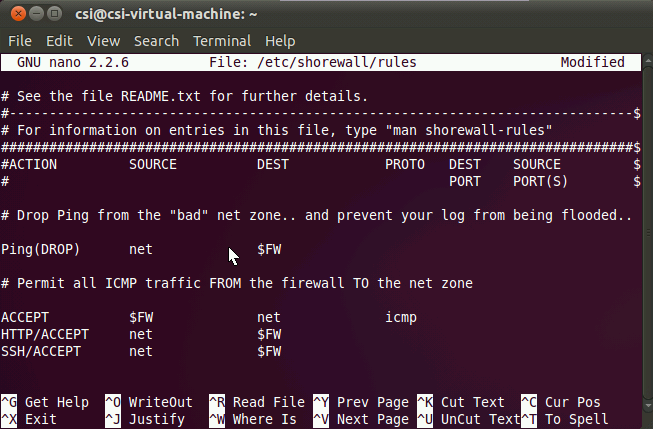
Now let’s edit the Rules file:
sudo nano /etc/shorewall/rules
You need to add the following after the bottom ACCEPT line (see screen shot):
HTTP/ACCEPT net $FW
SSH/ACCEPT net $FW

Again, once done in the editor, hit Control-O, Enter, and Control-X.
That is it! Your firewall is up and running.
The next step is to know where your server is. You will find it at /var/www. The Index file is the root page of your web server.
And lastly, you can now start to add files here and edit the Index page to build your web. Enjoy!

