 In this article we will get you started with the iPerf tool. We will be using it in a Linux environment, but know that it is available for all systems at http://iperf.fr.
iPerf is used to test performance, throughput, packet loss, and jitter on TCP/IP networks.
iPerf defaults to testing TCP – port number 5002.
iPerf does this from the Layer 4 protocols: UDP and TCP (it defaults to TCP)
It is likely that you will not get 100% of the bandwidth – especially with TCP. On a 100Mbps link, you might get throughput in the mid 90Mbps range. We would consider this good throughput. TCP window size and segment size, along with flow and congestion control algorithms will limit the performance of TCP. There is a ‘-w’ option that can change the TCP window size to experiment.
iPerf will report packet loss and jitter experienced during the test.
If throughput is different in each direction, there may be a duplex mismatch.
Some Common Parameters
-t – time, this controls how long the test will last. Default is 10 seconds.
-p – Port, this sets the port number for the Iperf server to be listening on. Be cautious of firewall blocking issues here.
-u – UDP, not TCP, forces Iperf to use UDP for testing. No retransmission of lost packets as with TCP, but lost packets will be reported. Using UDP will get you closer to the actual speed. UDP tests are best for testing what VoIP or Video will perform. Use with the -b bandwidth parameter.
-b – bandwidth, this option allows you to set the UDP data rate, the default is 1Mbps.
-d – Dual test, the default Iperf behavior is to from the client to the server. With this option data transfer is bi-directional, meaning both are sending data at the same time.
-P – Parallel transfers, this allows Iperf to run multiple transfers with multiple systems concurrently. The purpose of this is to attempt to consume large capacity interfaces (e. 1Gbps) and burden them.
The latest version is iPerf3.
In all the examples below, if you are running the pre-version3, use “iperf”, and replace this with “iperf3” for the latest version.
Installation
We will not go into the installation, but assume you can follow the directions for downloading and installing the tool from their web site. You can check to see if iPerf is installed by entering:
iperf --version
or
iperf3 --version
If you are running Linux, and iPerf is not installed, simple enter:
sudo apt-get install iperf3
Once installed, understand that iPerf is primarily run from the command line or via a terminal window.
If the older version of iPerf is installed you should get something like this:
![]()
If you have iPerf3 installed it will look like this:

You can see I have version 3.7 running on my system.
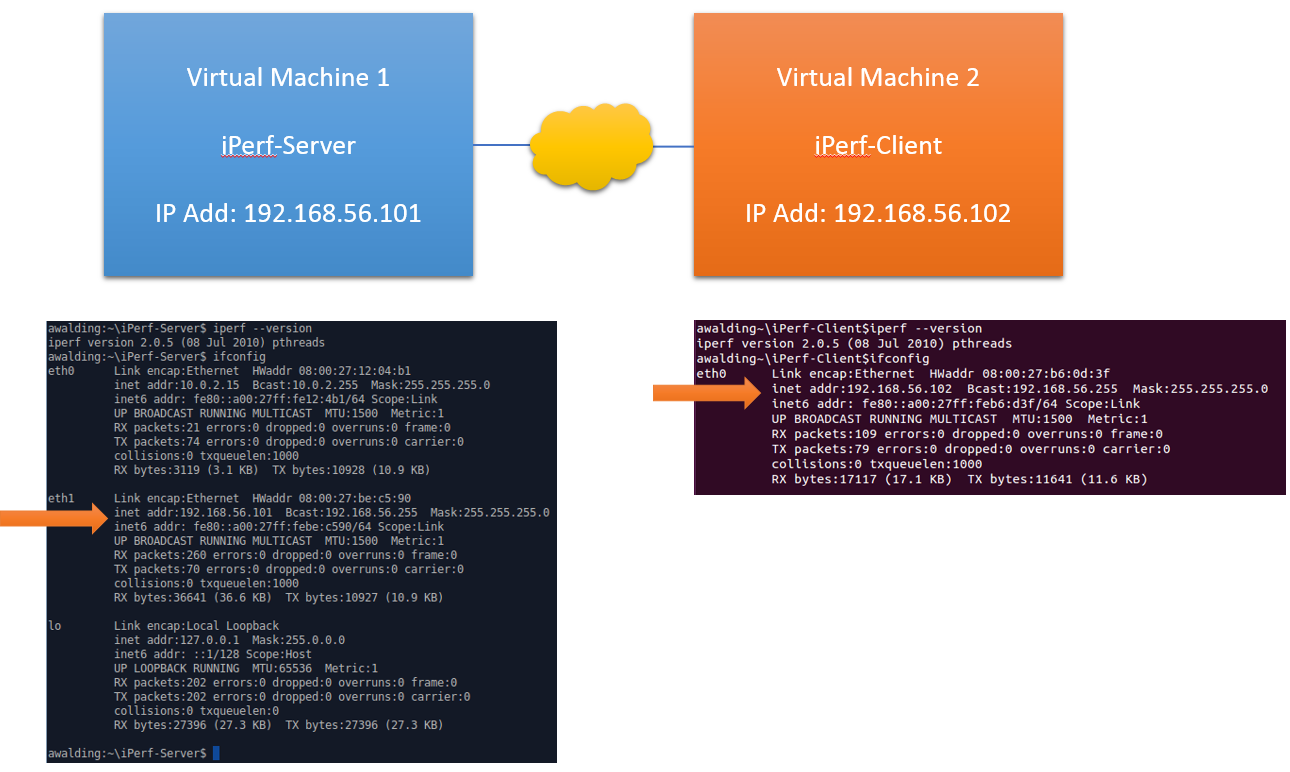
You will also note I am running iPerf3 on a virtual machine. In my set up I will be using two virtual machines (clones of one another) both running iPerf to provide the environment necessary to use iPerf. The reason for this is that iPerf runs in a server and client mode, assuming (as its logo suggests) that we will be testing between two systems across a network.
In your network you can use completely different systems, of course, and they can be running different operating systems with iPerf running. As long as they can ping each other, you should be able to easily test using iPerf.
Here is a picture of my virtual network:

Simple Initial TCP Test
With iPerf installed and the two systems reachable, let’s get the server started. The command is:
iperf -s
The result will be the server has iPerf running and is listening for connections on port 5001:

Now on the client, we will connect to the server with the following command:
iperf -c 192.168.56.101
We will see both systems respond with output.
On the client:

On the Server:

What we see is that iPerf ran a default TCP connection speed test. Because these are two systems running as virtual machines, I got 626 Mb/s between the two! This is likely the speed of my bus!
OK, we are off to a great start.
There are a ton of different tests built into the iPerf program. Here is the iPerf3 help output for reference:
root@kali:~# iperf3 -h
Usage: iperf3 [-s|-c host] [options]
       iperf3 [-h|--help] [-v|--version]

Server or Client:
  -p, --port      #         server port to listen on/connect to
  -f, --format   [kmgtKMGT] format to report: Kbits, Mbits, Gbits, Tbits
  -i, --interval  #         seconds between periodic throughput reports
  -F, --file name           xmit/recv the specified file
  -A, --affinity n/n,m      set CPU affinity
  -B, --bind      <host>    bind to the interface associated with the address <host>
  -V, --verbose             more detailed output
  -J, --json                output in JSON format
  --logfile f               send output to a log file
  --forceflush              force flushing output at every interval
  -d, --debug               emit debugging output
  -v, --version             show version information and quit
  -h, --help                show this message and quit
Server specific:
  -s, --server              run in server mode
  -D, --daemon              run the server as a daemon
  -I, --pidfile file        write PID file
  -1, --one-off             handle one client connection then exit
  --rsa-private-key-path    path to the RSA private key used to decrypt
                            authentication credentials
  --authorized-users-path   path to the configuration file containing user
                            credentials
Client specific:
  -c, --client    <host>    run in client mode, connecting to <host>
  --sctp                    use SCTP rather than TCP
  -X, --xbind <name>        bind SCTP association to links
  --nstreams      #         number of SCTP streams
  -u, --udp                 use UDP rather than TCP
  --connect-timeout #       timeout for control connection setup (ms)
  -b, --bitrate #[KMG][/#]  target bitrate in bits/sec (0 for unlimited)
                            (default 1 Mbit/sec for UDP, unlimited for TCP)
                            (optional slash and packet count for burst mode)
  --pacing-timer #[KMG]     set the timing for pacing, in microseconds (default 1000)
  --fq-rate #[KMG]          enable fair-queuing based socket pacing in
                            bits/sec (Linux only)
  -t, --time      #         time in seconds to transmit for (default 10 secs)
  -n, --bytes     #[KMG]    number of bytes to transmit (instead of -t)
  -k, --blockcount #[KMG]   number of blocks (packets) to transmit (instead of -t or -n)
  -l, --length    #[KMG]    length of buffer to read or write
                            (default 128 KB for TCP, dynamic or 1460 for UDP)
  --cport         <port>    bind to a specific client port (TCP and UDP, default: ephemeral port)
  -P, --parallel  #         number of parallel client streams to run
  -R, --reverse             run in reverse mode (server sends, client receives)
  --bidir                   run in bidirectional mode.
                            Client and server send and receive data.
  -w, --window    #[KMG]    set window size / socket buffer size
  -C, --congestion <algo>   set TCP congestion control algorithm (Linux and FreeBSD only)
  -M, --set-mss   #         set TCP/SCTP maximum segment size (MTU - 40 bytes)
  -N, --no-delay            set TCP/SCTP no delay, disabling Nagle's Algorithm
  -4, --version4            only use IPv4
  -6, --version6            only use IPv6
  -S, --tos N               set the IP type of service, 0-255.
                            The usual prefixes for octal and hex can be used,
                            i.e. 52, 064 and 0x34 all specify the same value.
  --dscp N or --dscp val    set the IP dscp value, either 0-63 or symbolic.
                            Numeric values can be specified in decimal,
                            octal and hex (see --tos above).
  -L, --flowlabel N         set the IPv6 flow label (only supported on Linux)
  -Z, --zerocopy            use a 'zero copy' method of sending data
  -O, --omit N              omit the first n seconds
  -T, --title str           prefix every output line with this string
  --extra-data str          data string to include in client and server JSON
  --get-server-output       get results from server
  --udp-counters-64bit      use 64-bit counters in UDP test packets
  --repeating-payload       use repeating pattern in payload, instead of
                            randomized payload (like in iperf2)
  --username                username for authentication
  --rsa-public-key-path     path to the RSA public key used to encrypt
                            authentication credentials

[KMG] indicates options that support a K/M/G suffix for kilo-, mega-, or giga-

iperf3 homepage at: https://software.es.net/iperf/
Report bugs to:     https://github.com/esnet/iperf
iPerf UDP Test
Now let’s set up the client and server to run a UDP-based test.
On the server:
iperf -s -u -i 1
This sets the server into UDP mode with an interval of 1 sec.

Now let’s run the UDP test from the client:
iperf -c -u
Here is the result on the client:

You can adjust the bandwidth from the default 1Mb/s. Here is an example from the client:

Note I added the ‘-b 10m’ command and we even got one packet out of order!
How cool.
Now let’s try running iPerf against one of their servers across the Internet:
iperf3 -c iperf.he.net

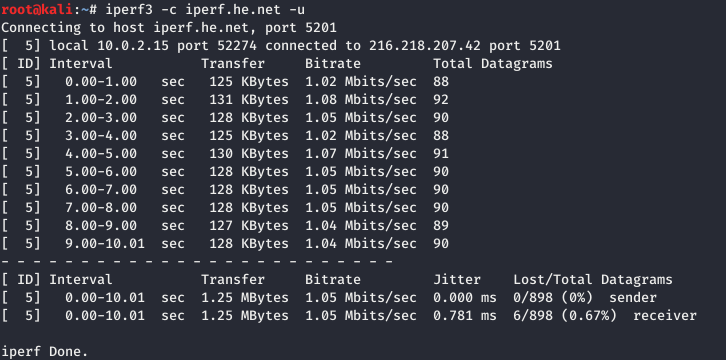
Now lets see if UDP will work:
iperf3 -c iperf.he.net -u

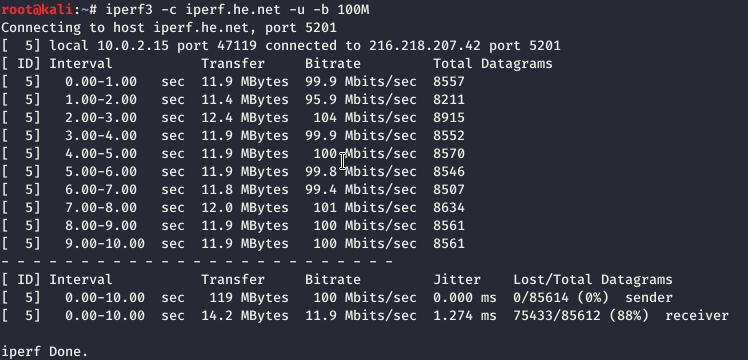
OK – but it defaulted to the 1Mbit/sec, so let’s add a higher bandwidth option:
iperf3 -c iperf.he.net -u -b 100M

I hope you are off to a great start with iPerf. There is so much more. We will dive deeper in the next article.
Did we miss something? I hope you find this article and its content helpful. Comments are welcomed below. If you would like to see more articles like this, please support us by clicking the patron link where you will receive free bonus access to courses and more, or simply buying us a cup of coffee!, and all comments are welcome!
