The following is a must have reference for Linux systems networking operations.
We will be using the two basic commands: ‘ifconfig’, ‘iwconfig’, and ‘ip’. If you are the rtoot or administrator you should have no issues using the commands as shown. If you do not, you may want to use ‘sudo’ in front of the commands shown.
I am running this on Kali Linux, which is Debian.
View the Network Settings of all Interfaces on the System
Let’s use the plain vanilla ifconfig command with no arguments in a terminal window first:
ifconfig
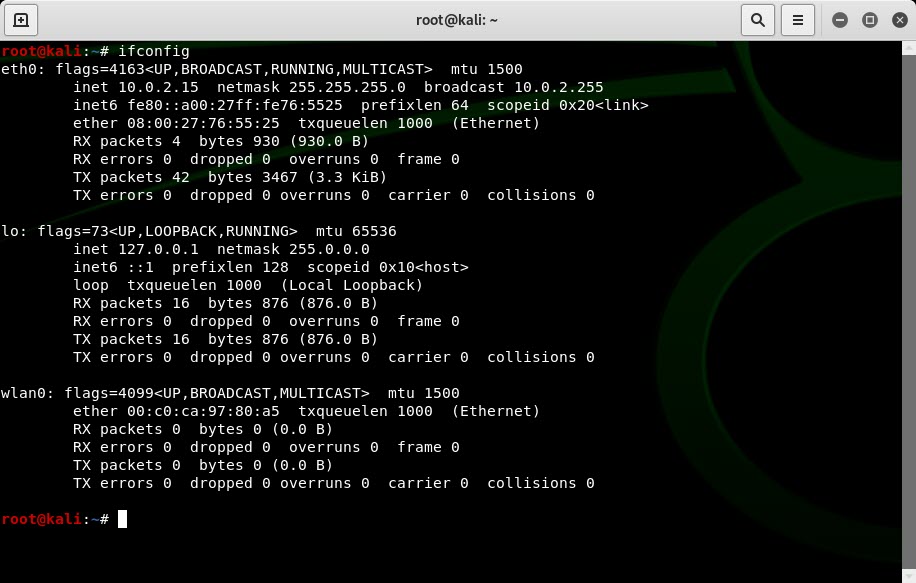
We see the network interfaces shown, with flags, MTU, address configuration (both IPv4 and IPv6), the MAC address, then some statistics (received and transmitted packets as well as associated errors). When you run this command you may see more interfaces including your wireless LAN/Wi-Fi interface.
To just view your WLAN/Wi-Fi interfaces use the iwconfig command:
iwconfig
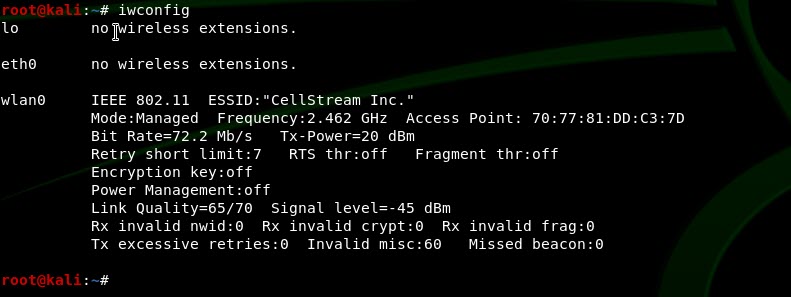
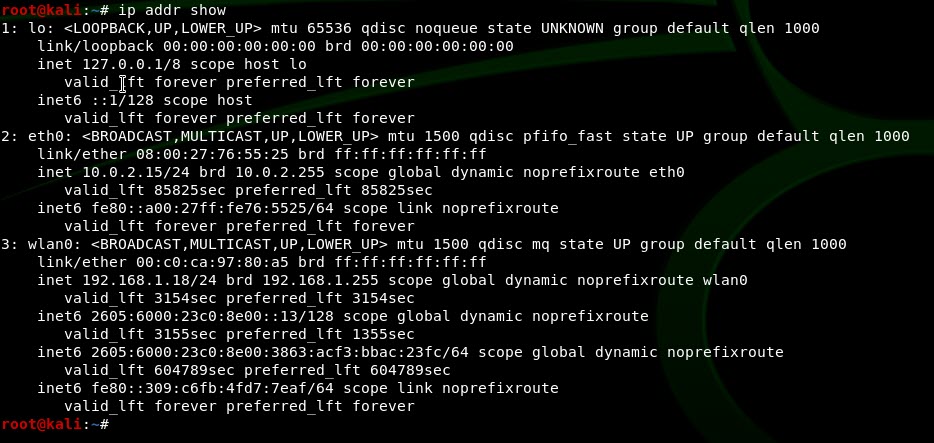
The equivalent command using ‘ip’ is the ‘ip addr show’ command:
ip addr show
View the Network Settings of a Specific Interface
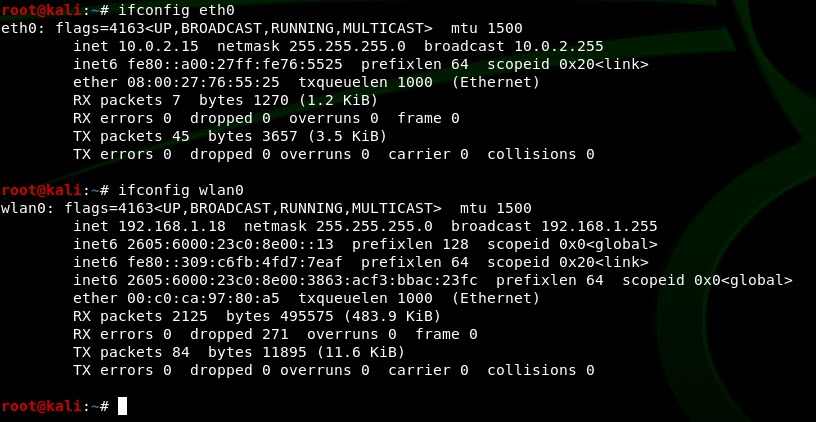
To examine a specific interface, use the ifconfig with the name of the interface:
ifconfig eth0
Using the ip command:
ip addr show dev eth0
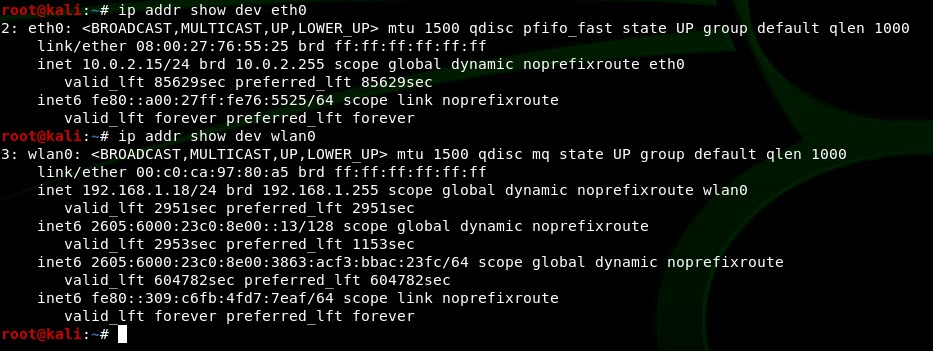
You can see in the above command outputs that IPv6 addresses also exist. You can check IPv6 by using the following command:
cat /proc/net/if_inet6
Here is the command to use ifconfig for IPv6:
ifconfig eth0 | grep "inet6 addr:"
I will try to inject IPv6 below, but there is a separate article on this here.
Enabling or Disabling a Network Interface
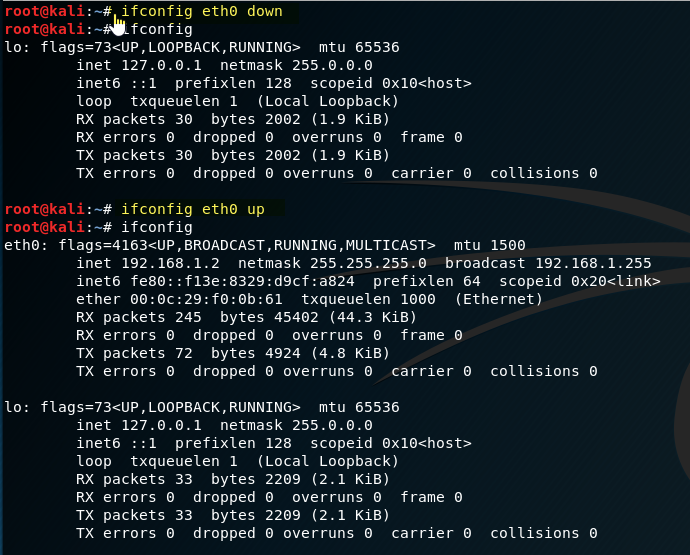
Using the term ‘down’ or ‘ifdown’ along with the interface name will disable the interface. The opposite, ‘up’ will bring the interface back up. The example below takes eth0 down and then brings it back up. Note the ifconfig command is run after each to show the changes:
With the ip command we use the link set command:
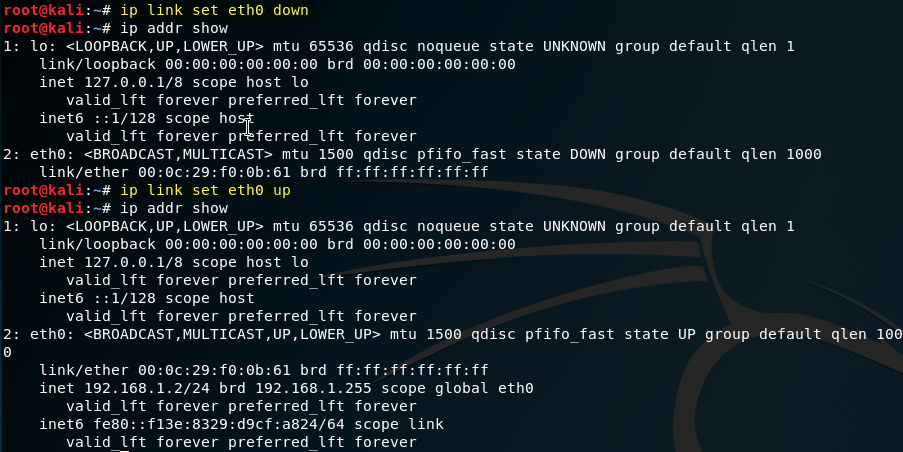
Note the subtle differene that with the ip command you see the interface is “DOWN”.
Statically Assigning an IPv4 or IPv6 Address to an Interface
Normally your system will use DHCP (bootp) to acquire an IP address from the local DHCP server or router. However, if you want to statically set the IP address, there are serveral ways. Keep in mind that you may need to also set the network mask as well, so even though you can do these things one at a time, we show the methods for doing them all.
Using the ifconfig command we will use the following:
ifconfig eth0 192.168.1.99 netmask 255.255.255.0 broadcast 192.168.1.255
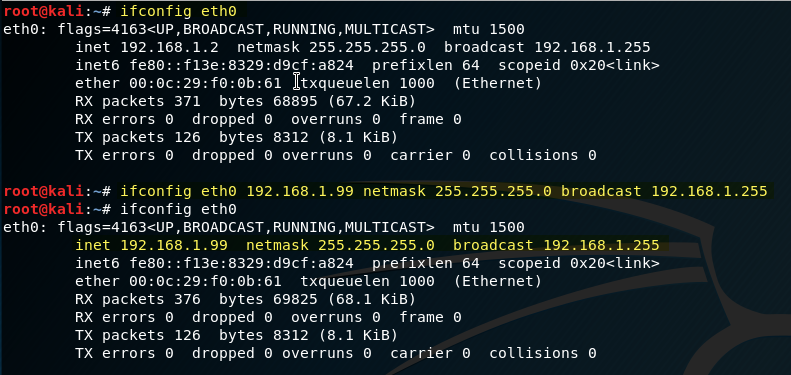
You can do each command one at a time as follows:
ifconfig eth0 192.168.1.99
ifconfig eth0 netmask 255.255.255.0
ifconfig eth0 broadcast 192.168.1.255
To configure an IPv6 address using the ‘ifconfig’:
ifconfig eth0 inet6 add 2001:db8:1:1::1/64
Using the ‘ip’ command:
ip -6 addr add <ipv6address>/<prefixlength> dev eth0
Another way to change the IPv4 address is to edit the following file: /etc/network/interfaces
We will use nano to do this (in terminal enter nano /etc/network/interfaces ):
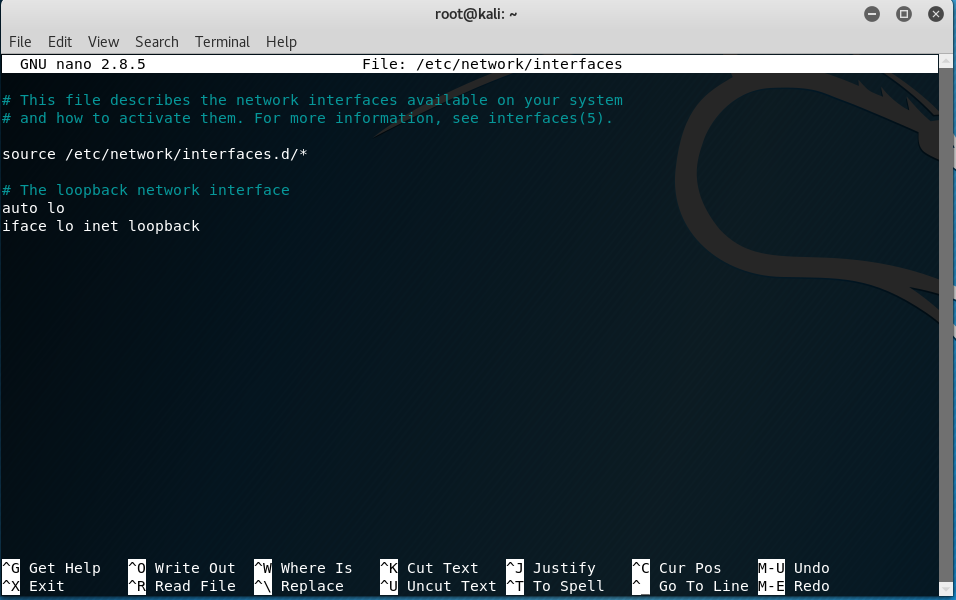
What we are going to do is add the following text into the file:
# The Ethernet 0 network interface
auto eth0
iface eth0 inet static
address 192.168.1.100
netmask 255.255.255.0
gateway 192.168.1.1
Your screen should look like this:
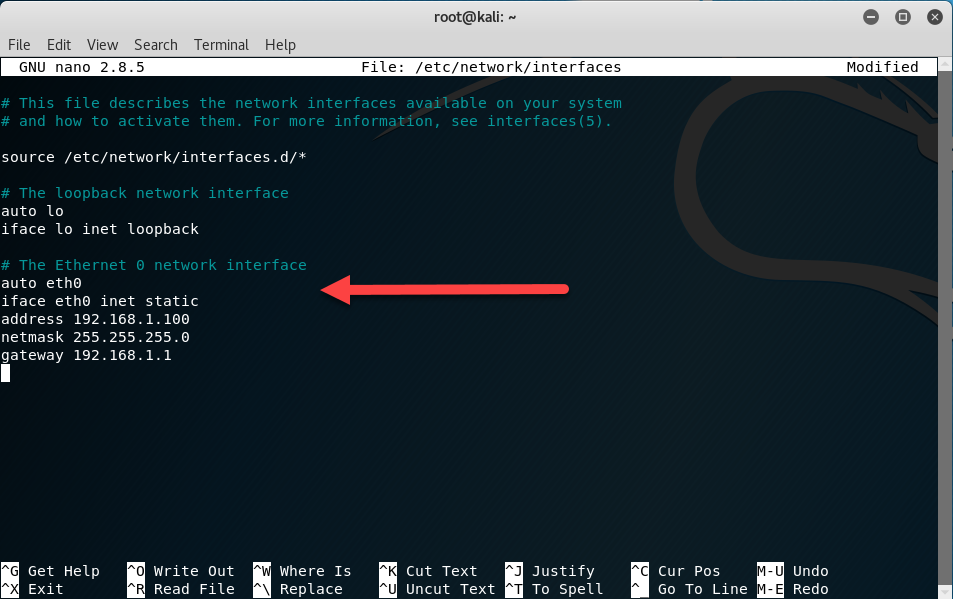
Then save the file. Check the file is as you want with the ‘cat’ command:
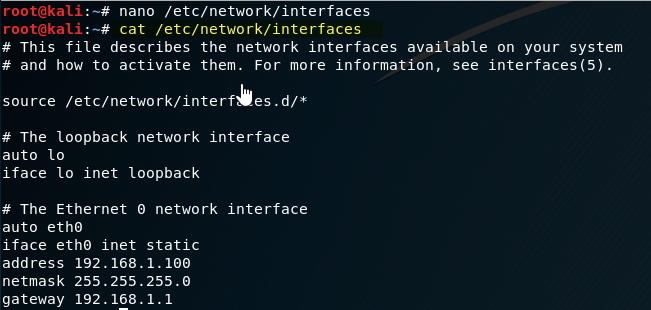
OK, all looks good. You will have to issue the following command to make the changes take effect:
/etc/init.d/networking restart
In some cases you will have to reboot.
Then the changes will be made:

If you wanted to statically configure an IPv6 prefix, you can follow the same procedure with nano, except add the following lines editing to suit your needs:
# Ethernet 0 network IPv6 address
iface lo0 inet6 loopback
iface eth0 inet6 static
  address 2001:db8:0:0::1        # replace with your static address
  netmask 64
  gateway fe80::1                # replace with your gateway link local address
Again, you will have to restart the networking or the system to have these changes take effect.
Removing an IPv4 or IPv6 Address from a Network Interface
To remove an IPv4 address from the network interface using the ‘ifconfig’ command:
ifconfig eth0 del 192.168.1.100
To remove an IPv4 address from the network interface using the ‘ip’ command:
ip addr del <ipv4address> dev eth0
To remove an IPv6 address from the network interface using the ‘ifconfig’ command:
ifconfig eth0 inet6 del <ipv6address>/<prefixlength>
To remove an IPv6 address from the network interface using the ‘ip’ command:
ip -6 addr del <ipv6address>/<prefixlength> dev eth0
Changing the MAC Address of an Interface
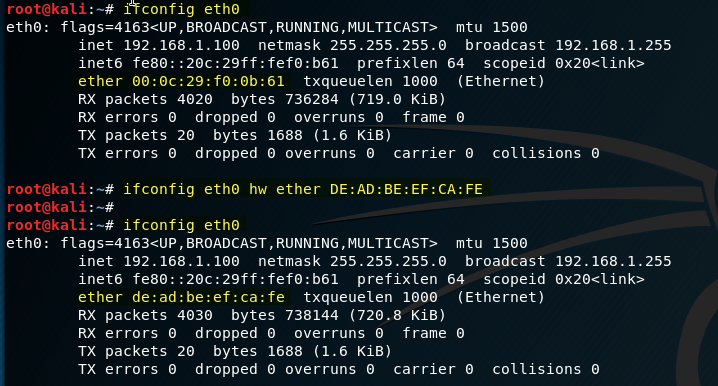
Sometimes we need to spoof another MAC/machine, or just change our MAC to make it easy to filter packets if we are sniffing them.
To change the MAC address of an interface use this commend:
ifconfig eth0 hw ether DE:AD:BE:EF:CA:FE
Here is a before, a change and an after view:
Enabling/Disabling Promiscuous Mode
Normal Ethernet behavior filters packets that arrive at your interface that are not destined for your MAC, a Multicast group that you belong to, or broadcast. These packets are essentially politely dropped. In most switched ethernet environments the ethernet switch does this also.
What if you wanted to allow any and all packets received without being filtered? This is called promiscuous mode. Turning it on is easy:
ifconfig eth0 promisc
Turning it off is also easy:
ifconfig eth0 -promisc
Try this and then use a packet capture (using a tool like Wireshark) to see if you notice a difference in your network.
Changing the MTU of an Interface
Normal ethernet has an MTU of 1500 bytes. What if you want to run a network with bigger packets/frames? First you will have to turn on ‘jumbo frames’ on all your switched ethernet interfaces (switches and routers). Now you can increase the size of the MTU on the Linux system:
ifconfig eth0 mtu 2000
We have increased it to 2000 bytes above.
Want to make smaller packets/frames? Just lower the number. The problem here is that you will likel;y see slower throughput using smaller frames.
Checking the System Route Table
If you are a networking person, you know that every computer/system running Linux has a route table. To display the route table use:
ip route show

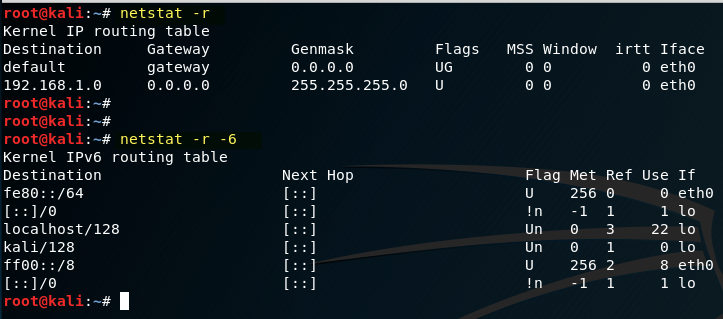
Another way to look at the routing table is with the ‘netstat’ command:
netstat -r or netstat -r -6
Set DNS
more /etc/resolve.conf
echo nameserver 8.8.8.8 > /etc.resolve.conf
Set the IP Address
ifconfig eth0 192.168.1.10/24 up
Set the Default Gateway
route add default gw 192.168.1.1
To make any of these setting default:
update -rc.d networking defaults
To Fix Network Settings Permanently
nano /etc/network/interfaces
Change the following:
iface eth0 inet static
address a.b.c.d
netmask 255.255.255.0
network 192.168.1.0 (not actually necessary)
broadcast 192.168.1.255 (not actually necessary)
gateway 192.168.1.1
SSH
sshd - generate
start ssh
To make this persistent:
update -rc.d -f ssh defaults
We hope this helps as a reference for Linux networking commands to at least get you up to speed.
Comments? Missing parts? Let us know.

